Author: Growww

  • The Ultimate DIY Ecommerce Growth Blueprint for Indian Fashion Store Owners (2026 Edition)

    The Ultimate DIY Ecommerce Growth Blueprint for Indian Fashion Store Owners (2026 Edition)

    If you are an Indian ecommerce founder selling:

    • Sarees
    • Kurtis
    • Indo-western wear
    • Streetwear
    • Boutique labels
    • D2C apparel

    This guide is written specifically for you.

    Not theory.
    Not generic advice.
    This is a practical, implementation-ready blueprint you can execute yourself — even if you don’t have an in-house team.

    And throughout this guide, I’ll keep asking one important question:

    After reading this, can you actually implement it yourself?

    If the answer is yes — this blog has done its job.

    Why Most Indian Fashion Ecommerce Stores Struggle

    Let’s be honest.

    Most Indian fashion stores:

    • Run ads before fixing conversion issues
    • Depend too much on discounts
    • Ignore product page psychology
    • Don’t calculate CPA before spending
    • Have beautiful websites that don’t convert

    In India, competition is brutal:

    • Myntra
    • Ajio
    • Amazon India
    • Flipkart

    You cannot compete on discounts.

    You compete on:

    • Experience
    • Niche positioning
    • Trust
    • Smart marketing

    Step 1: Fix Your Foundation Before Running Ads

    If your store doesn’t convert organically, ads will only burn money.

    A. Homepage Optimization for Indian Buyers

    Homepage optimization for Indian fashion ecommerce showing trust signals and clear navigation

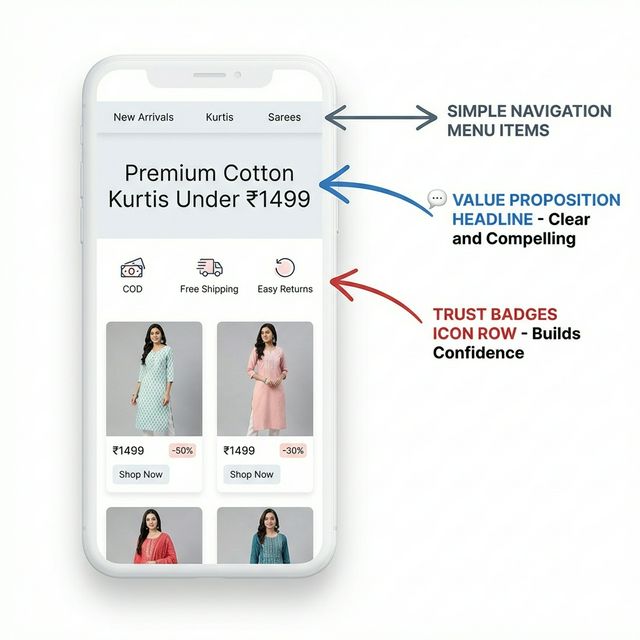
    Your homepage must answer in 5 seconds:

    1. What do you sell?
    2. Who is it for?
    3. Why should I trust you?

    Example: Cotton Kurti Brand

    Bad headline:

    “Welcome to our store”

    Better:

    “Premium Cotton Kurtis Under ₹1499 – Perfect for Office & Daily Wear”

    Immediately clear.

    Add These Trust Signals (Critical for India)

    • COD Available
    • Free Shipping Above ₹999
    • Easy 7-Day Returns
    • 10,000+ Happy Customers
    • Made in India

    Indian buyers are skeptical. Trust reduces friction.

    Ask yourself:

    Does my homepage build confidence or confusion?

    B. Navigation Must Be Simple (Mobile First)

    Remember: 80–90% of Indian traffic is mobile.

    Your menu should look like:

    • New Arrivals
    • Kurtis
    • Sarees
    • Festive Wear
    • Sale
    • Track Order

    Not:

    • Collections
    • Explore
    • Lifestyle
    • Moodboards

    Clarity beats creativity.

    Step 2: Category Page Optimization (Your Real Sales Engine)

    Most Indian founders ignore this page.

    But category pages often convert more than homepages.

    Ecommerce category page design checklist including filters and sorting for Indian buyers

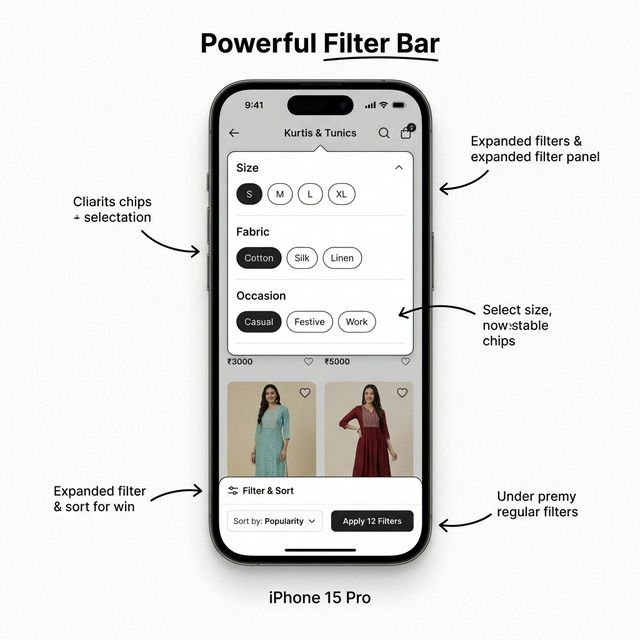
    What Your Category Page Must Have

    ✔ Sort by:

    • Price Low to High
    • Newest
    • Best Selling

    ✔ Filters:

    • Size (XS–XXL)
    • Fabric (Cotton, Rayon, Silk)
    • Price
    • Occasion (Office, Festive, Casual)

    If a customer searching “office kurti under 1200” cannot filter quickly — they leave.

    Add SEO Content to Category Pages

    Instead of empty pages, add 150–250 words.

    Example:

    “Buy cotton kurtis online in India at affordable prices. Our collection features breathable fabrics perfect for office wear…”

    This helps rank for:

    • Buy cotton kurti online India
    • Cotton kurti under 1000
    • Office wear kurtis for women

    Can you write 200 words describing your category?

    Yes.
    Then you can implement this today.

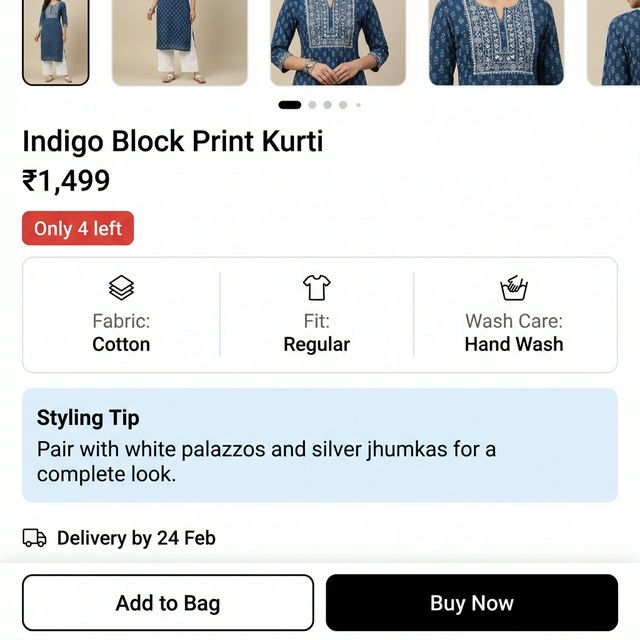
    Step 3: Product Page Optimization (Where 80% Revenue Is Decided)

    If there is one page you must perfect — this is it.

    Product page optimization checklist with urgency triggers and delivery estimation

    A. Images Sell Fashion

    Minimum required:

    • Front view
    • Back view
    • Close-up fabric
    • Model image
    • Size chart image
    • Video (optional but powerful)

    Indian customers zoom heavily before buying.

    B. Product Description Structure

    Don’t write essays.

    Use this format:

    Product Highlights:

    • Fabric:
    • Fit:
    • Length:
    • Wash Care:
    • Model Wearing Size:

    Styling Tip:

    “Pair this kurti with white palazzos and oxidised jewellery for a festive look.”

    This increases perceived value.

    C. Add Urgency & Scarcity

    Indian customers delay decisions.

    Add:

    • Only 4 left in stock
    • Selling Fast
    • 27 people viewed this today

    But don’t fake numbers. Keep it realistic.

    D. Delivery Estimation

    Very powerful.

    Show:
    “Delivery by 22–24 Feb to Hyderabad”

    It reduces hesitation.

    Ask yourself:

    Do I clearly show when the product will reach the customer?

    If no — implement it.

    Step 4: Cart Page Optimization (Reduce Drop-Off)

    Cart abandonment in India can go up to 70%.

    Let’s reduce it.

    Strategies to reduce cart abandonment in India including free shipping nudges and trust badges

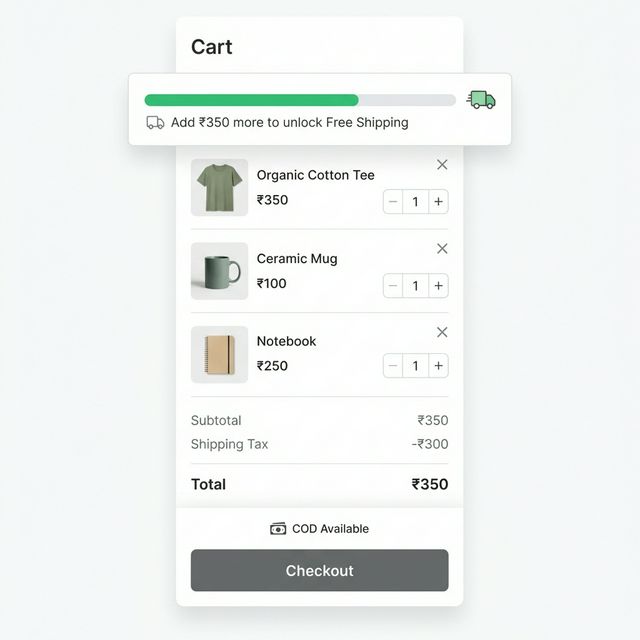
    A. Free Shipping Threshold

    Show:
    “Add ₹350 more to unlock Free Shipping”

    This increases AOV.

    B. COD Option Visibility

    Many Indian customers check for COD before payment.

    Clearly show:
    COD Available

    If COD unavailable, be transparent.

    C. Remove Distractions

    Cart page should not show:

    • Blog posts
    • Too many cross-sells
    • Large banners

    Cart page = decision moment.

    Step 5: Checkout Optimization for Indian Ecommerce

    If you’re on platforms like Shopify or WooCommerce:

    Check this immediately.

    A. Guest Checkout Must Be Enabled

    Forcing account creation kills conversions.

    B. Reduce Form Fields

    Only ask:

    • Full Name
    • Phone
    • Address
    • Pincode

    Do not ask:

    • Gender
    • Alternate phone
    • Company name

    Every extra field = drop in conversion.

    C. Offer UPI

    India runs on UPI.

    If you don’t support:

    • UPI
    • COD
    • Net Banking

    You lose orders.

    Step 6: SEO Strategy for Indian Fashion Stores

    Now let’s talk traffic.

    Don’t Target Generic Keywords

    Wrong:

    • Sarees
    • Kurtis

    Right:

    • buy linen saree online
    • cotton kurti under 1200
    • office wear kurti for women India
    • bridal lehenga under 15000

    Buyer intent keywords convert better.

    Calculate Before Running Ads

    Example:

    CPC = ₹18
    Conversion Rate = 2%

    CPA = ₹900

    If your average margin is ₹700 — you lose ₹200 per sale.

    Most founders don’t calculate this.

    Ask yourself:

    Do I know my break-even CPA?

    If not — calculate today.

    Step 7: Google Ads Structure for Indian Fashion Stores

    1. Search Campaign

    Target high intent keywords:

    • buy silk saree online
    • best cotton kurti brand India

    CTR Benchmarks:

    • Brand keywords: 25%+
    • Non-brand: 8–15%

    Below 5%? Improve ad copy.

    2. Remarketing Campaign (Highest ROAS)

    Target:

    • Product viewers (last 30 days)
    • Cart abandoners
    • Instagram traffic

    Remarketing gives highest profitability.

    3. Negative Keywords (Stop Wasting Money)

    Add negatives like:

    • free
    • how to stitch
    • DIY
    • wholesale
    • jobs
    • training

    This prevents junk traffic.

    Step 8: WhatsApp & Retention Strategy (Very Important in India)

    Indians respond strongly to WhatsApp.

    After purchase:

    • Send order confirmation
    • Send delivery updates
    • Send styling suggestions
    • Send reorder reminders

    Instead of:
    “Buy again”

    Send:
    “Hi Priya, your cotton kurti pairs beautifully with white palazzos. Here’s 10% off on matching bottoms.”

    Retention > Acquisition.

    Step 9: Thank You Page Monetisation

    After purchase, show:

    • 10% off next purchase
    • Refer a friend & earn ₹200
    • Follow us on Instagram
    • Join VIP WhatsApp group

    You already paid for the customer. Maximize LTV.

    30-Day Implementation Plan

    Week 1

    Fix homepage & product pages

    Week 2

    Optimize cart & checkout

    Week 3

    Keyword research + negative keywords

    Week 4

    Launch small budget search campaign (₹20,000 test)

    Month 2
    Add remarketing

    Month 3
    Scale winning campaigns

    Final Self-Audit Checklist

    Answer honestly:

    • Is my product page better than competitors?
    • Is checkout friction-free?
    • Do I calculate CPA before ads?
    • Do I use remarketing?
    • Do I collect WhatsApp leads?

    If you fix these — you don’t need huge budgets.

    The Hard Truth for Indian Ecommerce Owners

    Most Indian fashion stores don’t fail because of competition.

    They fail because:

    • Weak conversion optimization
    • No clarity in positioning
    • Poor ad structure
    • No financial calculations
    • No retention strategy

    If you fix fundamentals, even ₹15–20K/month ad budget can become profitable.

  • DIY Shipping & Fulfillment Setup for Indian D2C Brands 2026: Complete Guide

    DIY Shipping & Fulfillment Setup for Indian D2C Brands 2026: Complete Guide

    Setting Up Shipping Yourself? Here’s the Full Picture

    Shipping looks simple until your first RTO, lost package, or weight dispute. This guide covers every step we handle for our fulfillment clients – so you can decide if DIY makes sense for your brand.

    Estimated time: 15-25 hours for full setup
    Ongoing time: 2-5 hours/week for management
    Technical skill: Low-Medium
    Cost: ₹0 for aggregator signup + per-shipment charges

    Phase 1: Strategy Decisions (Before Any Setup)

    Questions to Answer First

    1. Shipping cost model: Free shipping? Flat rate? Weight-based? Free above threshold?
    2. Delivery promise: Can you promise 3-5 days? 5-7 days?
    3. COD policy: Offer COD? With limits? Extra charge?
    4. Pincode coverage: Pan-India or specific states?
    5. Packaging: Standard boxes or custom branded?

    Phase 2: Aggregator Selection (Week 1)

    Don’t sign up with individual couriers. Use an aggregator for multi-courier access and better rates.

    Major Aggregators in India

    Aggregator Strengths Best For
    Shiprocket Best Shopify integration, WhatsApp tracking Most D2C brands
    Pickrr Good rates, reliable Cost-conscious brands
    Eshipz Advanced analytics Data-focused brands
    Delhivery Direct Single carrier reliability High volume brands

    Setup Steps

    1. Sign up for aggregator account
    2. Complete KYC (PAN, GST, bank details)
    3. Wait for approval (1-3 days)
    4. Add pickup address(es)
    5. Configure default weight/dimensions
    6. Set up wallet/payment method for COD remittance

    Phase 3: Shopify Integration (Week 1-2)

    1. Install shipping app from Shopify App Store
    2. Authenticate with aggregator account
    3. Map order statuses (fulfilled = shipped, etc.)
    4. Configure automatic order sync
    5. Set up shipping rate display at checkout
    6. Configure pincode serviceability check
    7. Test order flow: place order → sync → create shipment → print label

    Phase 4: Shipping Rules & Automation (Week 2)

    1. Set up courier allocation rules (Delhivery for metros, Xpressbees for Tier 2/3, etc.)
    2. Configure weight dispute auto-approval limits
    3. Set up NDR (Non-Delivery Report) handling workflow
    4. Configure RTO prediction rules (if available)
    5. Set up automated tracking notifications (SMS/WhatsApp)
    6. Configure COD remittance cycle preferences

    Phase 5: Packaging & Operations (Ongoing)

    1. Source packaging materials (boxes, mailers, tape)
    2. Create packing SOP for team
    3. Set up daily pickup schedule with couriers
    4. Configure label printing setup
    5. Create returns handling workflow
    6. Set up inventory sync (if using multiple channels)

    What Usually Goes Wrong (Why Brands Need Help)

    • Weight disputes: Couriers charge more, you lose margins
    • Courier allocation: Wrong courier for pincode = delays = RTO
    • NDR mismanagement: Failed attempts not followed up, orders return
    • Tracking gaps: Customers can’t track, flood support with queries
    • COD reconciliation: Missing remittances, manual tracking nightmare
    • RTO costs: 20-40% RTO eating all profit
    • Rate negotiation: Paying retail rates instead of volume discounts

    The Hidden Costs of Poor Shipping

    • RTO cost: ₹100-200 per failed delivery (forward + return)
    • Weight disputes: ₹20-50 extra per shipment if not managed
    • Support burden: 30-40% of customer queries are about delivery
    • Lost customers: Bad delivery experience = no repeat purchase

    Honest Assessment

    If you:

    • Have time to manage daily shipping operations
    • Can handle NDR follow-ups promptly
    • Don’t mind manual reconciliation work
    • Are comfortable negotiating with multiple couriers

    …then DIY shipping is manageable!

    If you want optimized courier allocation, proactive NDR management, and someone to handle the operational headaches – that’s what we do.

    Our Fulfillment Integration Service

    We set up optimized shipping operations:

    • Aggregator setup with negotiated rates
    • Smart courier allocation rules
    • WhatsApp tracking integration
    • NDR management workflows
    • RTO reduction strategies
    • Ongoing support and optimization

    → View our Fulfillment Service

    📦 Get shipping sorted: Chat with us on WhatsApp

  • DIY WhatsApp Automation for D2C Brands 2026: Complete Setup Guide

    DIY WhatsApp Automation for D2C Brands 2026: Complete Setup Guide

    Setting Up WhatsApp Automation Yourself? Here’s What’s Actually Involved

    WhatsApp automation is essential for Indian D2C brands – but setting it up correctly requires more than just installing an app. This guide covers every step we handle for our retention marketing clients.

    Estimated time: 20-40 hours for full setup
    Ongoing time: 3-5 hours/week for management
    Technical skill: Medium
    Cost: ₹2,000-10,000/month for tools + Meta verification fees

    Phase 1: WhatsApp Business API Access (Week 1-2)

    This is where most D2C founders get stuck. The WhatsApp Business App is free but limited. For automation, you need the API.

    Business Verification Steps

    1. Create Meta Business Manager (if not already done)
    2. Complete business verification (government documents, domain verification)
    3. Wait for approval (3-14 days, sometimes longer)
    4. Choose a Business Solution Provider (BSP): Wato, Interakt, AiSensy, etc.
    5. Sign up with BSP and pay first month
    6. Connect BSP to your Meta Business Manager
    7. Register your phone number for WhatsApp Business API
    8. Wait for number verification (1-3 days)

    Common Blockers

    • ❌ Meta verification rejected – business documents don’t match
    • ❌ Phone number already registered on WhatsApp personal
    • ❌ Display name rejected – doesn’t match business name
    • ❌ API access denied – policy violations on Facebook Page

    Phase 2: Template Approval (Week 2-3)

    You can’t just send any message via WhatsApp API. Every message type needs template approval from Meta.

    Templates You Need

    1. Order confirmation template
    2. Shipping notification template
    3. Delivery update template
    4. Abandoned cart reminder template (needs careful wording)
    5. COD confirmation template
    6. Payment reminder template
    7. Review request template
    8. Win-back/promotional template

    Template Approval Tips

    • No promotional language in transactional templates
    • Include opt-out option in marketing templates
    • Avoid words like “free”, “discount”, “offer” in non-marketing templates
    • Approval takes 24-72 hours per template
    • Rejections require resubmission (another 24-72 hours)

    Phase 3: Shopify Integration (Week 3)

    1. Install BSP’s Shopify app
    2. Authenticate and connect store
    3. Map order events to message triggers
    4. Set up automation rules (which orders trigger which messages)
    5. Configure timing (immediate, delayed, etc.)
    6. Set up abandoned cart flow timing
    7. Configure COD verification flow
    8. Test with real orders (place test orders, verify messages)

    Phase 4: Advanced Flows (Week 4+)

    1. COD-to-prepaid conversion messages with payment links
    2. Review request automation post-delivery
    3. Cross-sell/upsell sequences
    4. Win-back flows for lapsed customers
    5. Broadcast campaigns for promotions
    6. Customer support chatbot setup

    What Usually Goes Wrong (Issues We Fix)

    • Messages not sending – trigger misconfiguration
    • Template rejections – wrong category or promotional language
    • Customer complaints – too many messages, opt-outs
    • COD conversion links broken – payment gateway integration issues
    • Timing issues – abandoned cart messages sent too late
    • Duplicate messages – multiple triggers firing
    • Number quality issues – spam reports affecting delivery

    The Hidden Costs

    • BSP subscription: ₹2,000-10,000/month
    • Per-conversation charges: ₹0.30-1.00 per message
    • Meta verification fees: One-time charges for some verifications
    • Time cost: 20-40 hours setup + ongoing management
    • Learning curve: Template rejections, flow debugging

    Honest Assessment

    If you:

    • Have 20-40 hours for initial setup
    • Can dedicate 3-5 hours/week ongoing
    • Have patience for Meta’s approval processes
    • Are comfortable with technical integrations

    …then DIY WhatsApp automation is achievable!

    If you’d rather skip the learning curve and start with proven flows that work, we handle everything from API access to optimized automation sequences.

    Our WhatsApp Automation Service

    We set up complete WhatsApp ecosystems:

    • API access and verification handled
    • All templates created and approved
    • Shopify integration configured
    • Proven automation flows implemented
    • COD-to-prepaid conversion optimization
    • Ongoing support and optimization

    → View our Retention Marketing Service

    💬 Get WhatsApp automation: Chat with us on WhatsApp

  • DIY Meta Ads for D2C Brands 2026: The Complete Setup Nobody Tells You About

    DIY Meta Ads for D2C Brands 2026: The Complete Setup Nobody Tells You About

    Running Meta Ads Yourself? Here’s What’s Actually Involved

    Every D2C founder thinks Meta ads are simple: create an ad, set a budget, get sales. Then they burn through ₹50,000 with nothing to show for it.

    This guide covers everything we do for our performance marketing clients – so you can decide if you want to tackle it yourself.

    Estimated time: 15-20 hours to set up, 5-10 hours/week ongoing
    Minimum budget to learn: ₹30,000-50,000 (expect losses while learning)
    Technical skill: Medium

    Phase 1: Account Infrastructure (Before Any Ads)

    Business Manager Setup

    1. Create Meta Business Manager at business.facebook.com
    2. Verify your business (government ID + documents)
    3. Create or claim your Facebook Page
    4. Create or claim your Instagram account
    5. Link Page and Instagram to Business Manager
    6. Add team members with appropriate permissions

    Ad Account Setup

    1. Create ad account within Business Manager
    2. Set timezone to IST
    3. Set currency to INR
    4. Add payment method (credit card recommended over UPI)
    5. Set spending limits to control costs

    Pixel & Tracking

    1. Create Meta Pixel
    2. Install Pixel on Shopify (via Facebook sales channel)
    3. Set up Conversions API for server-side tracking
    4. Verify events firing correctly (PageView, ViewContent, AddToCart, Purchase)
    5. Test with Meta Pixel Helper Chrome extension
    6. Set up custom conversions if needed

    Phase 2: Creative Production

    This is where most D2C brands fail. You need constant fresh creatives.

    Minimum Creative Requirements

    • 5-10 static images (different angles, lifestyle, UGC-style)
    • 3-5 video ads (15-30 seconds, hook in first 3 seconds)
    • Multiple ad copy variations (short, medium, long)
    • Multiple headlines and CTAs

    Creative Best Practices for India

    • Show price upfront (Indians compare before clicking)
    • Include “Free Shipping” or “COD Available”
    • Use Hindi/regional language for Tier 2/3
    • UGC-style outperforms polished studio shots
    • Show product in use, not just product shots

    Phase 3: Campaign Structure

    The Testing Framework

    1. Create Campaign Budget Optimization (CBO) campaign
    2. Set up 3-5 ad sets with different audiences
    3. Each ad set: 2-3 creative variations
    4. Start with ₹500-1000/day per ad set
    5. Run for 3-7 days before judging
    6. Kill underperformers, scale winners

    Audience Testing

    1. Interest-based audiences (3-5 variations)
    2. Lookalike audiences from purchasers (1%, 2%, 5%)
    3. Broad targeting (let Meta optimize)
    4. Remarketing audiences (site visitors, cart abandoners)

    Phase 4: Ongoing Optimization

    This is the part that takes 5-10 hours every week:

    1. Daily: Check spend vs. results, pause obvious losers
    2. Every 3 days: Analyze ad set performance, shift budgets
    3. Weekly: Creative refresh (2-3 new variations minimum)
    4. Weekly: Audience analysis and refinement
    5. Bi-weekly: Full account audit and strategy review
    6. Monthly: Creative fatigue analysis, new concepts

    What Usually Goes Wrong (Why Brands Hire Us)

    • Pixel not firing correctly – purchases not tracked, Meta can’t optimize
    • Wrong campaign objective – optimizing for clicks instead of purchases
    • Creative fatigue – same ads for months, performance tanks
    • Audience overlap – competing against yourself, inflating costs
    • No attribution understanding – iOS changes breaking tracking
    • Budget spread too thin – ₹200/day across 10 ad sets = no data
    • Judging too early – killing ads before statistical significance

    The Hidden Costs of DIY

    • Learning budget: ₹30,000-1,00,000 in wasted ad spend while learning
    • Time cost: 20+ hours setup, 5-10 hours/week ongoing
    • Creative production: ₹10,000-50,000/month for photos/videos
    • Opportunity cost: Time not spent on product, customers, operations

    Honest Assessment

    If you:

    • Have ₹50,000+ to burn while learning
    • Can dedicate 10+ hours/week to ads
    • Enjoy data analysis and testing
    • Have reliable creative production pipeline

    …then DIY Meta ads can work!

    If your time is better spent elsewhere, we manage the entire process for brands at all stages.

    Our Performance Marketing Service

    We handle everything above plus:

    • Creative strategy and production coordination
    • Daily monitoring and optimization
    • Weekly reporting with actionable insights
    • Landing page recommendations
    • Integration with WhatsApp for retargeting

    → View our Performance Marketing Service

    📊 Get a free ad account audit: Chat with us on WhatsApp

  • DIY Shopify Store Setup in India 2026: Complete 47-Step Checklist

    DIY Shopify Store Setup in India 2026: Complete 47-Step Checklist

    Want to Build Your Own Shopify Store? Here’s Everything You Need to Do

    Setting up a Shopify store yourself is absolutely possible. This guide covers every step we handle for our clients – so you can do it yourself if you have the time.

    Estimated time: 60-100+ hours across 3-4 weeks
    Technical skill required: Medium-High
    Tools you’ll need: Shopify account, Razorpay account, Shiprocket account, domain, business documents

    Phase 1: Account Setup & Legal (Day 1-2)

    Shopify Account

    1. Sign up for Shopify free trial at shopify.in
    2. Choose a plan (₹1,994/month Basic recommended)
    3. Set up your store name and initial settings
    4. Configure timezone to IST (Asia/Kolkata)
    5. Set default currency to INR

    Legal Setup

    1. Create Privacy Policy (use Shopify generator + customize for India)
    2. Create Terms of Service
    3. Create Refund/Return Policy (crucial for D2C)
    4. Create Shipping Policy with delivery estimates
    5. Add GSTIN display in footer/about page
    6. Set up business address (required for invoices)

    Phase 2: Theme & Design (Day 3-7)

    Theme Selection

    1. Browse free themes (Dawn, Refresh, Sense) or purchase premium
    2. Install theme and preview with dummy products
    3. Customize header: logo, navigation, announcement bar
    4. Set up color scheme matching your brand
    5. Configure typography (use web-safe fonts or Google Fonts)

    Homepage Setup

    1. Create hero banner with CTA
    2. Add featured collections section
    3. Add testimonials/reviews section
    4. Add trust badges (secure payment, shipping, returns)
    5. Set up newsletter signup form
    6. Configure footer with links, contact info, social icons

    Phase 3: Products & Collections (Day 8-12)

    1. Plan your product taxonomy (categories, tags)
    2. Create collection pages with descriptions
    3. Add products with optimized titles (include keywords)
    4. Write compelling product descriptions (features + benefits)
    5. Upload high-quality product images (multiple angles)
    6. Set up variants (size, color) with correct inventory
    7. Configure pricing and compare-at prices for sales
    8. Add product tags for filtering
    9. Set up size charts (crucial for fashion)
    10. Configure inventory tracking

    Phase 4: Payment Gateway (Day 13-14)

    1. Sign up for Razorpay business account
    2. Complete KYC verification (PAN, GSTIN, bank details)
    3. Wait for Razorpay approval (2-7 days typically)
    4. Install Razorpay Shopify app
    5. Configure payment methods (UPI, cards, wallets, COD)
    6. Set up COD with appropriate limits
    7. Test payment flow with test mode
    8. Process a real ₹1 transaction to verify

    Phase 5: Shipping Setup (Day 15-16)

    1. Sign up for Shiprocket/Delhivery aggregator
    2. Install shipping app and connect to Shopify
    3. Set up pickup address(es)
    4. Configure shipping rates (free shipping threshold strategy)
    5. Set up pincode serviceability checker
    6. Configure order sync and label printing
    7. Test full order-to-shipment flow

    Phase 6: Going Live

    • Domain connection (purchase and point to Shopify)
    • SSL certificate verification
    • Mobile responsiveness testing
    • Speed optimization (image compression, app audit)
    • WhatsApp integration setup
    • Google Analytics configuration
    • Facebook Pixel installation
    • Final checkout testing

    Things That Usually Go Wrong (DIY Problems We Fix)

    • ❌ Razorpay KYC rejected – wrong document format
    • ❌ Shipping rates not calculating correctly
    • ❌ Mobile site looks broken on certain devices
    • ❌ Slow loading speed killing conversions
    • ❌ WhatsApp not triggering order messages
    • ❌ GST not showing correctly on invoices
    • ❌ COD orders with 40%+ RTO because no verification

    Honest Assessment

    If you have:

    • 60-100+ hours to spare
    • Technical comfort with new software
    • Patience for troubleshooting integrations
    • No urgent launch deadline

    …then DIY is absolutely viable!

    If you’d rather focus on product, marketing, and customers while we handle the tech – we can have you live in 15-20 days with everything configured correctly.

    Want Us to Handle This?

    We’ve done this 150+ times. Our package includes everything above plus WhatsApp automation, training, and 6 months support.

    → View our Shopify Development Service

    📞 Get a quote: Chat with us on WhatsApp

  • Shopify vs WooCommerce for Indian D2C Brands 2026: Honest Comparison

    Shopify vs WooCommerce for Indian D2C Brands 2026: Honest Comparison

    The Platform Decision That Makes or Breaks D2C Brands

    If you’re starting a D2C brand in India or considering a platform switch, you’ve probably spent hours reading contradictory advice about Shopify vs WooCommerce.

    We’ve built stores on both platforms. Here’s the honest comparison based on 150+ Indian D2C projects.

    Quick Verdict

    Choose Shopify If… Choose WooCommerce If…
    You want to focus on marketing/products, not tech You need maximum customization control
    You’re scaling fast and need reliability You have in-house developer resources
    Budget: ₹50K-2L for development Budget is tight, have time to manage

    Cost Comparison (Real Numbers for India)

    Shopify Total Cost of Ownership (Year 1)

    • Subscription: ₹24,000/year (Basic) to ₹90,000/year (Shopify)
    • Development: ₹50,000 – ₹1,50,000 (one-time)
    • Apps: ₹2,000 – ₹10,000/month
    • Transaction fees: 0% if using Shopify Payments, else 2%
    • Total Year 1: ₹1,00,000 – ₹3,50,000

    WooCommerce Total Cost of Ownership (Year 1)

    • Hosting: ₹15,000 – ₹60,000/year (Cloudways, AWS, etc.)
    • Development: ₹30,000 – ₹1,00,000 (one-time)
    • Premium plugins: ₹20,000 – ₹50,000/year
    • Maintenance: ₹5,000 – ₹20,000/month (updates, security, backups)
    • Transaction fees: Payment gateway fees only (2%)
    • Total Year 1: ₹1,25,000 – ₹4,00,000

    Reality check: WooCommerce isn’t actually cheaper when you factor in maintenance, security, and developer time.

    Indian Ecommerce Integration Comparison

    Payment Gateways

    Gateway Shopify WooCommerce
    Razorpay ✅ Official app ✅ Official plugin
    PayU ✅ Supported ✅ Supported
    Cashfree ✅ Supported ✅ Supported
    UPI ✅ Via Razorpay ✅ Via Razorpay

    Winner: Tie – both work great with Indian payment gateways.

    Shipping Partners

    Partner Shopify WooCommerce
    Shiprocket ✅ Native app ✅ Plugin available
    Delhivery ✅ Supported ⚠️ Manual integration
    Eshipz ✅ Supported ✅ Plugin available

    Winner: Shopify – cleaner integrations, better documentation.

    WhatsApp Automation

    Tool Shopify WooCommerce
    Wato ✅ Native app ⚠️ API integration needed
    Interakt ✅ Native app ✅ Plugin available
    AiSensy ✅ Supported ✅ Supported

    Winner: Shopify – more plug-and-play options.

    Performance & Reliability

    Shopify

    • 99.99% uptime guarantee
    • Automatic scaling during sales
    • Built-in CDN
    • Automatic security updates

    WooCommerce

    • Uptime depends on your hosting
    • Need to manually scale for traffic spikes
    • CDN setup required (Cloudflare, etc.)
    • You’re responsible for security

    Winner: Shopify – especially during Diwali/festive sales when traffic spikes 10x.

    The Real Reason We Recommend Shopify for D2C

    It’s not about features – both platforms can technically do everything. It’s about what you want to spend your time on.

    With WooCommerce you’ll spend time on:

    • Plugin updates and compatibility issues
    • Security patches and monitoring
    • Hosting optimization
    • Finding developers when something breaks

    With Shopify you’ll spend time on:

    • Marketing and customer acquisition
    • Product development
    • Customer experience

    For D2C founders, every hour spent on tech is an hour not spent on growth.

    When WooCommerce Actually Makes Sense

    • You have a dedicated developer on team
    • You need complex custom functionality
    • You’re building something unique (not standard ecommerce)
    • You’re already invested in WordPress ecosystem

    Our Recommendation

    For 90% of Indian D2C brands in 2026, Shopify is the right choice. The ecosystem, reliability, and integration quality save you more in the long run than WooCommerce’s lower subscription cost.

    Get Expert Help Choosing

    Still confused? We’ve helped 150+ brands choose and build their platforms. Let’s discuss your specific needs.

    🤔 Get honest advice: Chat with us on WhatsApp

  • Meta Ads CAC Crisis 2026: Why Smart D2C Brands Are Pivoting to Retention

    Meta Ads CAC Crisis 2026: Why Smart D2C Brands Are Pivoting to Retention

    The ₹500 CAC Problem Nobody Wants to Talk About

    Here’s a conversation happening in every D2C brand’s office in 2026:

    “Our Meta CAC is now ₹450. Product price is ₹599. We’re literally paying customers to buy from us.”

    This isn’t an exaggeration. Reddit threads, founder communities, and industry reports all confirm: customer acquisition costs on Meta have increased 25-40% year-over-year for Indian D2C brands.

    The brands that will survive 2026 aren’t the ones spending more on ads. They’re the ones mastering retention.

    Why Meta Ads CAC Is Exploding

    1. Market Saturation

    Every D2C brand discovered Meta ads. Competition for the same audience has driven CPMs up 50%+ since 2023.

    2. iOS Privacy Changes

    Apple’s ATT framework broke Meta’s tracking. Retargeting is less effective, cold audiences cost more to convert.

    3. Creative Fatigue

    Indian consumers see 1000+ ads daily. Standing out requires 10x the creative effort than it did in 2022.

    4. Wrong Metrics Focus

    Brands optimize for ROAS on first purchase. But if that customer never returns, you’ve lost money.

    The Math That Changes Everything

    Consider two scenarios:

    Metric Acquisition-Focused Retention-Focused
    Monthly ad spend ₹5,00,000 ₹3,00,000
    CAC ₹400 ₹400
    New customers 1,250 750
    Repeat purchase rate 15% 40%
    Total orders (6 months) 1,437 1,800
    Revenue (₹1,500 AOV) ₹21.5L ₹27L

    Result: 40% less ad spend, 25% more revenue. This is the power of retention.

    7 Retention Strategies for Indian D2C in 2026

    1. WhatsApp Lifecycle Marketing

    Not just order updates – proactive engagement:

    • Day 3: How-to-use content
    • Day 14: Feedback request + cross-sell
    • Day 30: Replenishment reminder (consumables)
    • Day 60: Win-back offer

    → Our WhatsApp & Retention Service

    2. Loyalty Programs That Work

    Simple programs outperform complex ones:

    • Points per rupee spent
    • Tier-based benefits (5% → 10% → 15% discount)
    • Birthday rewards
    • Referral bonuses

    3. Subscription/Replenishment Models

    Applicable to: skincare, supplements, food, pet supplies, baby products.

    Subscription customers have 3-5x higher LTV than one-time buyers.

    4. Post-Purchase Experience

    The delivery is part of your brand:

    • Branded unboxing experience
    • Thank you cards with discount for next order
    • Surprise samples of new products
    • QR code to WhatsApp for support

    5. Email Marketing (Yes, It Still Works)

    For every ₹1 spent on email, expect ₹36-42 return:

    • Welcome series (5-7 emails)
    • Category-based newsletters
    • Back-in-stock alerts
    • Price drop notifications

    6. User-Generated Content

    Reviews, photos, and videos from real customers:

    • Social proof for new visitors
    • Free content for ads
    • Community building

    7. Smart Segmentation

    Treat different customers differently:

    • VIP customers: Early access, exclusive products
    • At-risk customers: Win-back campaigns
    • Category-specific: Personalized recommendations

    Building a Retention-First Tech Stack

    What you need:

    • Shopify – Customer data foundation
    • WhatsApp (Wato/Interakt) – Direct communication
    • Klaviyo/Mailchimp – Email automation
    • Judge.me/Stamped – Reviews and UGC
    • Loyalty app – Smile.io, Yotpo

    Our Retention Marketing Services

    At Growww Tech, we build complete retention systems:

    📈 Boost your retention: Get a free retention audit on WhatsApp

  • COD Fraud in Indian Ecommerce 2026: Real Stories & How Smart D2C Brands Fight Back

    COD Fraud in Indian Ecommerce 2026: Real Stories & How Smart D2C Brands Fight Back

    The COD Fraud Epidemic Nobody Talks About

    Every week on Reddit’s r/IndianEcommerce and r/entrepreneur groups, a D2C founder shares the same horror story:

    “Got 47 orders yesterday. 31 were COD. 19 of those RTOed. My margin is gone. I’m literally paying to run this business.”

    COD fraud isn’t just an inconvenience – it’s killing profitable D2C businesses. Let’s break down the real problem and real solutions.

    The Brutal Economics of COD Fraud

    Here’s what a fraudulent COD order actually costs you:

    • Forward shipping: ₹60-100
    • Return shipping: ₹60-100
    • Packaging cost: ₹20-50
    • Product damage risk: 10-15% of returns are unsellable
    • Customer acquisition cost: ₹200-500 (wasted)
    • Team time: Order processing, follow-ups, returns management

    Total loss per fraudulent order: ₹400-800+

    If you’re running at 30% RTO on COD (common for new brands), and 50% of your orders are COD, nearly 15% of your total orders are pure loss.

    Types of COD Fraud (From Real Cases)

    1. Impulse Orders

    Customer orders at 2 AM after seeing your ad. By delivery day, they’ve forgotten, changed their mind, or bought elsewhere.

    Solution: Order confirmation call/WhatsApp within 2 hours

    2. Competitor Sabotage

    Competitors placing bulk fake orders to drain your inventory and cash flow.

    Solution: IP tracking, order velocity alerts, COD limits per customer

    3. Address Fishing

    Fake addresses to test if your brand ships to certain areas before placing larger orders fraudulently.

    Solution: Address verification, pincode serviceability at checkout

    4. Multi-Size Orders

    Customer orders 3 sizes of the same item, keeps one, refuses the other two COD deliveries.

    Solution: Limit variants per order, partial prepaid for multiple items

    5. Delivery Agent Fraud

    Some courier partners mark orders as “customer refused” when customer wasn’t even contacted.

    Solution: Multiple courier partners, delivery analytics, NDR management

    The 7-Point COD Fraud Prevention Stack

    1. WhatsApp Order Confirmation

    Send immediate WhatsApp message after COD order with order details. Ask for confirmation reply. No reply = flag for manual review.

    → Our WhatsApp Automation Service

    2. COD-to-Prepaid Conversion

    Offer ₹50-100 discount for prepaid within 1 hour of order. Convert 20-30% of COD to prepaid.

    Tools: Wato, Interakt, Shiprocket Engage

    3. Partial COD

    Collect ₹99-199 upfront via UPI, rest as COD. Massively increases order commitment.

    Apps: Partialy, Razorpay Magic Checkout

    4. IVR/OTP Verification

    Automated call or SMS OTP before order processing. Filters out fake numbers.

    Apps: Penguin COD, CODfirm, Kwik

    5. Smart COD Limits

    • No COD for orders under ₹500 (low commitment signals)
    • No COD for first-time customers in high-RTO pincodes
    • COD limit per customer (3 orders max)

    6. Pincode Risk Scoring

    Track RTO rates by pincode. Auto-disable COD for high-risk areas (40%+ RTO).

    7. Delivery Partner Optimization

    Use multi-courier aggregators with smart allocation based on pincode performance.

    → Our Fulfillment Integration Service

    Real Results from Brands We’ve Helped

    • Fashion D2C brand: Reduced RTO from 38% to 14% in 60 days
    • Beauty brand: Converted 32% of COD orders to prepaid via WhatsApp
    • Electronics brand: Identified and blacklisted 400+ fraudulent pincodes

    Stop Bleeding Money on COD Fraud

    We set up complete fraud prevention systems for Indian D2C brands:

    🛡️ Get a free fraud audit: Chat with us on WhatsApp

  • Shopify Store Development Cost in India 2026 – Complete Pricing Breakdown

    Shopify Store Development Cost in India 2026 – Complete Pricing Breakdown

    How Much Does a Shopify Store Cost in India in 2026?

    If you’re searching for “Shopify store development cost India” or “Shopify website price”, you’ve found the most comprehensive guide. We’ve built 150+ Shopify stores for Indian D2C brands, and we’re sharing exactly what things cost in 2026.

    Quick Answer: A professional Shopify store in India costs between ₹50,000 to ₹3,00,000+ depending on complexity. Here’s the complete breakdown.

    Shopify Subscription Plans (Monthly)

    Plan Monthly Cost Best For
    Basic Shopify ₹1,994/month New D2C brands (most start here)
    Shopify ₹7,447/month Growing brands with team access
    Advanced ₹30,164/month High-volume brands needing reports
    Shopify Plus ₹1.5L+/month Enterprise (₹10Cr+ revenue)

    Our recommendation: Start with Basic Shopify. Upgrade when you consistently hit ₹10L+ monthly revenue.

    Development Costs Breakdown

    Option 1: DIY / Template Setup (₹0 – ₹20,000)

    What you get:

    • Free Shopify theme (Dawn, Sense, etc.)
    • Basic customization yourself
    • No professional design

    Hidden costs: Your time, learning curve, likely redesign later when you scale.

    Option 2: Freelancer (₹15,000 – ₹50,000)

    What you get:

    • Theme customization
    • Basic pages setup
    • Limited revisions

    Watch out for: No post-launch support, inconsistent quality, may not understand Indian ecommerce requirements (GST, Shiprocket, Razorpay).

    Option 3: Professional Agency (₹50,000 – ₹1,50,000)

    What you get: (This is what we offer at Growww Tech)

    • Complete store setup with all pages
    • Razorpay payment gateway integration
    • Shiprocket/Delhivery shipping setup
    • WhatsApp automation integration
    • GST configuration & legal compliance
    • Mobile optimization & Core Web Vitals
    • Post-launch support (6 months)
    • Training session on store management

    See our Shopify development service →

    Option 4: Custom Design + Development (₹1,50,000 – ₹3,00,000+)

    What you get:

    • Custom UI/UX design via Figma
    • Unique brand experience
    • Custom features and integrations
    • Ideal for established brands with specific requirements

    Additional Costs to Budget For

    Domain (₹500 – ₹1,500/year)

    Register via GoDaddy, Namecheap, or directly through Shopify.

    Premium Theme (₹0 – ₹20,000 one-time)

    Free themes work fine for most brands. Premium themes (Impulse, Prestige, Motion) offer advanced features.

    Essential Apps (₹2,000 – ₹15,000/month)

    • WhatsApp automation (Wato/Interakt): ₹2,000-8,000/month
    • Email marketing (Klaviyo): ₹0-5,000/month
    • Reviews (Judge.me): ₹0-1,500/month
    • SEO apps: ₹0-2,000/month

    Third-Party Services

    • Razorpay: 2% transaction fee
    • Shiprocket: Per-shipment charges
    • Meta Ads: Variable (₹50,000+/month recommended)

    What’s Included in Growww Tech’s Package

    Our ₹75,000 – ₹1,25,000 package includes:

    • ✅ Complete store development (15-20 days)
    • ✅ Razorpay payment integration
    • ✅ Shiprocket/Delhivery shipping
    • ✅ WhatsApp automation setup
    • ✅ GST & legal compliance
    • ✅ Mobile optimization
    • ✅ 6 months support
    • ✅ Training session

    Not included: Shopify subscription, domain, premium apps, product data entry.

    Why Brands Choose Us Over Freelancers

    From Reddit and real conversations, here’s what brands struggle with when using freelancers:

    • “Freelancer disappeared after payment”
    • “Store works but no one knows how to update it”
    • “Razorpay integration took 2 months”
    • “Mobile site is broken, they say it’s extra cost to fix”

    We’ve built systems to avoid all these problems. 150+ launches, 4.9★ Google rating.

    Get an Exact Quote for Your Store

    Every brand is different. Tell us about your requirements and get a customized quote within 24 hours.

    💰 Get your free quote: Chat with us on WhatsApp

    Related Services:

  • Fast & Flexible Delivery: How Indian D2C Brands Are Reducing RTO in 2026

    Fast & Flexible Delivery: How Indian D2C Brands Are Reducing RTO in 2026

    The RTO Crisis That’s Killing Indian D2C Brands

    Reddit is full of frustrated D2C founders sharing the same story: “30% RTO rate on COD orders is eating all our profits.” If you’re running an Indian ecommerce brand, you’ve probably lived this nightmare.

    The reality is brutal:

    • RTO rates of 20-40% are common for COD orders
    • 50%+ RTO for new brands without verification systems
    • Double shipping costs (forward + return) on every failed delivery
    • Lost inventory – products often damaged or unsellable after return

    But smart brands are cracking this problem. Here’s how.

    Why RTO Happens (Real Reasons from Reddit)

    From hundreds of Reddit discussions, here are the actual reasons Indian D2C orders get returned to origin:

    1. Fake or Incomplete Addresses

    Especially in Tier 2/3 cities, customers provide vague addresses like “Near the big temple, blue house.” Delivery agents can’t find them.

    2. Low Purchase Intent on COD

    COD removes financial commitment. Customers order impulsively, then forget or change their mind by delivery time.

    3. Delivery Delays

    If delivery takes 7-10 days, customers lose interest. They may have bought elsewhere or no longer want the product.

    4. Customer Unavailability

    Failed delivery attempts because customer wasn’t home. After 2-3 attempts, order returns to origin.

    5. Fraudulent Orders

    Competitors placing fake orders, customers ordering multiple sizes intending to return most, or outright fake details.

    7 Proven Strategies to Reduce RTO

    1. COD to Prepaid Conversion via WhatsApp

    The single most effective strategy. After a COD order is placed, send a WhatsApp message offering a small discount (₹50-100) for prepaid payment.

    • Tools: Wato, Interakt, Shiprocket Engage
    • Result: 20-30% of COD orders convert to prepaid

    2. Phone/OTP Verification for COD

    Automated IVR call or OTP verification before processing COD orders filters out fake/frivolous orders.

    • Apps: Penguin COD, CODfirm, Kwik by Shiprocket
    • Result: 15-25% reduction in RTO

    3. Partial COD Payments

    Collect a portion (₹50-200) upfront via UPI/cards, rest as COD. Increases commitment without removing COD option.

    • Apps: Partialy, Razorpay Magic Checkout
    • Result: 30-40% RTO reduction reported by brands

    4. Address Verification

    AI-powered address validation flags incomplete or suspicious addresses before shipping.

    • Pincode serviceability check at checkout
    • Google Maps integration for precise locations

    5. Fast Shipping (Under 3 Days)

    Quick delivery = less time for customers to change their mind. Partner with multiple couriers for optimal coverage.

    • Tools: Shiprocket, Delhivery, Pickrr

    6. Pre-Delivery Customer Engagement

    WhatsApp messages throughout the journey:

    • Order confirmation with product image
    • Shipping notification with tracking
    • Out for delivery reminder
    • Delivery attempt notification

    7. RTO Analytics & Flagging

    Track RTO patterns by pincode, customer, or product. Flag high-risk orders for manual review or prepaid-only.

    The Complete RTO Reduction Stack

    At Growww Tech, we set up comprehensive RTO reduction systems:

    • Shopify Store with smart checkout flows
    • WhatsApp Automation for COD-to-prepaid conversion
    • Shipping Integration with multi-courier support
    • Performance Marketing targeting high-intent audiences

    📉 Reduce your RTO: Get a free RTO audit on WhatsApp