Blog

  • Google Ads vs Meta Ads — ₹50K/Month D2C Budget

    Google Ads vs Meta Ads — ₹50K/Month D2C Budget

    “Should I run Google Ads or Facebook Ads?”

    Wrong question. The right question is: “How should I split my budget between Google and Meta based on where my customers are in the buying journey?”

    Google and Meta serve fundamentally different purposes. Treating them as interchangeable — or choosing only one — is the most expensive mistake Indian D2C brands make with their ad budget.

    The Fundamental Difference

    DimensionMeta (Facebook/Instagram)Google (Search + Shopping)
    IntentDemand creation (“I didn’t know I wanted this”)Demand capture (“I’m actively searching for this”)
    Best forBrand awareness, impulse purchases, new customer acquisitionHigh-intent buyers, comparison shoppers, repeat searches
    Typical CAC (India D2C)₹250-500₹150-350 (Shopping), ₹200-600 (Search)
    ROAS benchmark1.5-3x (good), 3-5x (great)3-6x (Shopping), 2-4x (Search)
    Creative dependencyExtremely high — creative IS the targetingLow — keywords and product feed matter more
    Scale ceilingHigh (can reach 260M FB users in India)Limited by search volume for your category
    Learning curveModerate (creative-heavy)Steep (keyword strategy, Shopping feed, bidding)

    The ₹50K/Month Budget Split

    For most Indian D2C brands starting with ₹50K/month (₹1,650/day), here’s how to allocate:

    Scenario 1: New Brand (0-6 months old)

    70% Meta (₹35K) / 20% Google Shopping (₹10K) / 10% Google Brand Search (₹5K)

    New brands need demand creation. Nobody is searching for your brand name yet. Meta introduces your product to people who don’t know it exists. Google Shopping captures the small percentage already searching for your product category. Google Brand Search protects your brand name from competitors.

    Scenario 2: Growing Brand (6-18 months, 500+ orders/month)

    50% Meta (₹25K) / 35% Google Shopping (₹17.5K) / 15% Google Search (₹7.5K)

    As brand awareness grows, more people search for your product category and brand name. Google becomes more efficient. Keep Meta for top-of-funnel acquisition and retargeting. Google Shopping becomes your highest-ROAS channel.

    Scenario 3: Established Brand (18+ months, known in category)

    40% Meta (₹20K) / 40% Google (₹20K) / 20% Retargeting across both (₹10K)

    Established brands have significant search volume. Google captures high-intent buyers at lower CAC. Meta maintains awareness and reaches new audiences. Retargeting across both platforms captures abandoners.

    Google Shopping: The Underused Goldmine for Indian D2C

    Most Indian D2C brands ignore Google Shopping — and they’re missing out on their lowest-CAC acquisition channel.

    Why Google Shopping works so well:

    • Intent is already there — Someone searching “buy organic face cream online” is ready to purchase. You’re not creating demand, you’re capturing it.
    • Visual format — Product image, price, and brand name appear at the top of search results. It’s like a free storefront on Google.
    • Lower CPC than Search — Google Shopping CPCs in India are typically ₹5-15 for D2C categories, vs ₹15-50 for text search ads.
    • Less competition — Most Indian D2C brands don’t run Shopping campaigns because setup is more complex. Less competition = cheaper clicks.

    How to set up:

    1. Create a Google Merchant Center account
    2. Submit your product feed (Shopify has a native Google channel app that does this automatically)
    3. Link Merchant Center to Google Ads
    4. Create a Performance Max or Standard Shopping campaign
    5. Set daily budget at ₹300-500 to start

    Meta Ads: What to Run at ₹25-35K/Month

    At this budget, run exactly 3 campaign types:

    1. Prospecting (60% of Meta budget) — Advantage+ Shopping campaign or broad targeting with 3-5 UGC-style creatives. Optimize for Add to Cart or Purchase. This finds new customers.

    2. Retargeting (30% of Meta budget) — Target website visitors, Add-to-Cart abandoners, and Instagram engagers from the last 30 days. Show them a specific offer (“You left something in your cart — here’s 10% off”).

    3. Lookalike/Advantage+ (10% of Meta budget) — Once you have 100+ purchases, create a lookalike audience from buyers. This scales your best customers.

    When to Go 100% One Platform

    Go 100% Meta if:

    • Your product category has very low search volume (niche/new categories)
    • Your product is highly visual and impulse-driven (fashion, jewelry, home decor)
    • You’re brand new and need to create awareness from scratch

    Go 100% Google if:

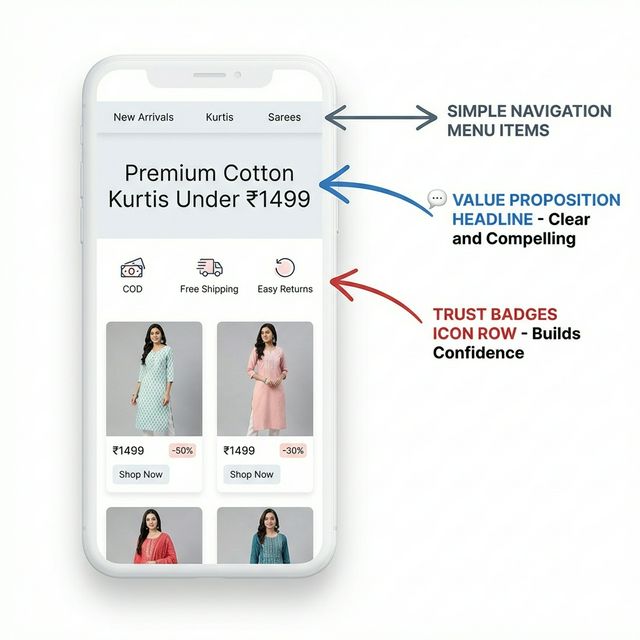
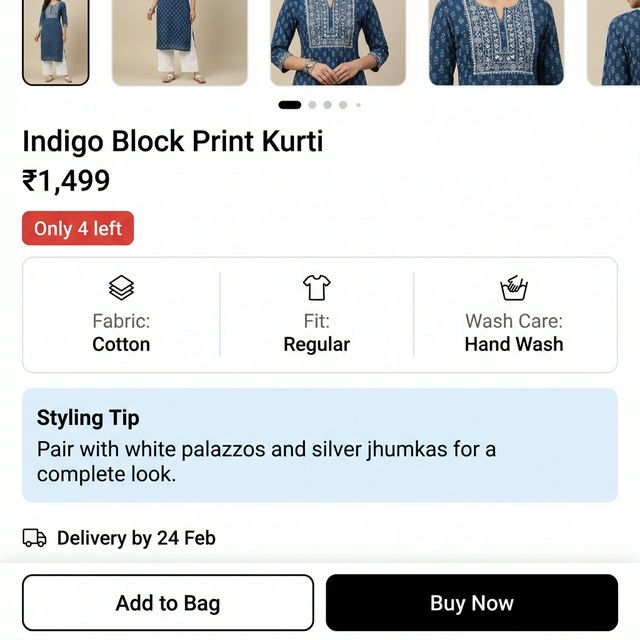
    • Your product has high search volume (“buy protein powder online,” “buy cotton kurta”)
    • You sell in a commodity category where price comparison drives purchases
    • Your creative production capacity is limited (Google Shopping needs product images, not video ads)

    For most Indian D2C brands: use both. Meta creates the demand that Google then captures.

    Tracking and Attribution: The Critical Piece

    Running both platforms means you need proper attribution. A customer might see your Meta ad, Google your brand name, and buy through Google — but Meta deserves credit for the awareness.

    Setup essentials:

    • Install Meta Pixel + Conversions API (CAPI) on your Shopify store
    • Install Google Analytics 4 with ecommerce tracking enabled
    • Use UTM parameters on every ad link
    • Review GA4’s “Model Comparison” report to see how Google and Meta work together
    • Don’t judge Meta solely on last-click attribution — it underreports by 20-30%

    Need Help With Your Ad Strategy?

    At Growww Tech, we manage combined Meta + Google ad campaigns for Indian D2C brands. We’ve helped brands go from ₹500/day test budgets to ₹50K/day profitable scale. Get a free ad account audit.

    Related reading:

  • Product Photography on Your Phone — ₹0, Pro Results

    Product Photography on Your Phone — ₹0, Pro Results

    “I spent ₹25,000 on professional product photography. The photos looked great but didn’t convert any better than my phone shots.”

    This is surprisingly common. Professional studio photos can actually hurt conversion because they look too polished — customers on Instagram and Shopify respond better to authentic, lifestyle-style photography that looks real and relatable.

    Here’s how to shoot product photos that sell using just your phone, natural light, and ₹0-500 in materials.

    What You Need (Total Budget: ₹0-500)

    ItemCostAlternative
    Smartphone (2020 or newer)Already haveAny phone with 12MP+ camera
    White chart paper (background)₹20-30White bedsheet, clean wall
    Natural light (window)₹0No alternative needed
    Phone tripod/stand₹200-400Stack of books + lean phone
    White thermocol sheet (reflector)₹30-50White chart paper or aluminum foil
    Editing app (Snapseed/Lightroom)₹0Free on all phones

    The 3 Types of Product Photos You Need

    1. Hero Shot (White/Clean Background)

    This is your main product image — clean, clear, on a white or light background. It’s what appears in search results, category pages, and thumbnails.

    How to shoot:

    1. Place a large white chart paper on a table, curving it up against a wall to create a seamless background (no visible edge)
    2. Position the table near a window — natural side lighting is the key to great phone photography. The window should be to the left or right of your product, never behind you.
    3. Place a white thermocol sheet on the opposite side of the window to bounce light and reduce shadows
    4. Set phone to 2x zoom (reduces distortion on close-ups), tap to focus on the product, and shoot
    5. Take 10-15 shots from slightly different angles. Pick the best 3.

    Pro tips:

    • Shoot between 10 AM – 2 PM when natural light is strongest and most neutral
    • Turn OFF flash — always. Flash creates harsh shadows and unnatural highlights.
    • Clean your camera lens (smudges are the #1 cause of hazy photos)
    • Use the back camera, not selfie camera
    • Enable grid lines for straight alignment

    2. Lifestyle Shots (Product in Use)

    Show the product in context — being worn, used, placed in a home setting. These images help customers visualize owning the product.

    Ideas by category:

    • Fashion: Wear it yourself or ask a friend to model. Shoot against a plain wall or in a well-lit room. Full-length mirror shots work for showing fit.
    • Skincare/beauty: Product on a bathroom shelf, in a flat lay with other skincare items, or someone applying it.
    • Food: Styled on a plate, in a kitchen setting, with ingredients scattered around.
    • Home decor: Placed in an actual room setup. Even a corner of your apartment works.
    • Jewelry: On a hand/neck/ear with natural lighting. A plain fabric background creates elegant contrast.

    3. Detail Shots (Texture, Labels, Features)

    Close-ups showing quality signals: fabric texture, stitching, ingredient labels, packaging details, size comparison (product next to a common object). These build trust, especially for first-time buyers.

    Editing Your Photos (5-Minute Workflow)

    Use Snapseed (free, by Google) or Lightroom Mobile (free tier). Here’s the exact edit workflow:

    1. Crop — Square (1:1) for Instagram and Shopify. Leave some space around the product.
    2. Brightness — Increase by +20 to +40. Phone photos tend to be slightly dark.
    3. Contrast — Slight increase (+10 to +20) makes the product pop.
    4. Shadows — Lift shadows (+20 to +30) to reveal detail in darker areas.
    5. White balance — Adjust if the photo looks yellowish (from indoor lighting). Make whites look white.
    6. Sharpness — Slight increase (+15 to +25) for crisp details.

    That’s it. Don’t over-edit. Don’t add filters. The goal is a clean, bright, accurate representation of your product.

    How Many Product Photos Do You Need?

    For your Shopify or WooCommerce product page, aim for 5-8 images per product:

    1. Hero shot (clean white background) — front view
    2. Hero shot — back or alternate angle
    3. Lifestyle shot — product in use
    4. Detail shot — close-up texture or feature
    5. Scale shot — product with common reference object
    6. Packaging shot — what the customer receives
    7. Ingredients/label shot (for food, skincare)
    8. Customer photo/UGC (once you have reviews)

    Background Removal: Make It Look Professional

    Want that clean, transparent/white background look? Use free tools:

    • remove.bg — Free AI background removal. Upload photo, get clean cutout in seconds. Free for up to 50 images/month at standard resolution.
    • Canva — Background remover tool in the free plan (limited) or Pro plan. Also useful for creating Instagram posts from your product photos.
    • Photoroom — Mobile app specifically designed for product photography. Auto-removes background and offers templates.

    When to Hire a Professional Photographer

    Phone photography gets you to 100-500 orders. Consider professional photography when:

    • You’re listing on Amazon/Flipkart — Marketplaces have strict image guidelines (pure white background, minimum resolution, specific angles). Professional shots help with compliance.
    • You’re doing 500+ orders/month — At this scale, the ROI on professional photos justifies the cost.
    • You sell high-ticket items (₹3,000+) — Premium products need premium presentation.
    • You need video content — Product videos for ads and Reels are harder to do well on phone alone at scale.

    Cost for professional ecommerce photography in India: ₹300-800 per product (5-8 images), with packages of 20-50 products costing ₹8,000-25,000.

    Need Help Setting Up Your D2C Store?

    At Growww Tech, we build Shopify and WooCommerce stores optimized for conversion — including product page layout, image optimization for speed, and mobile-first design. Let’s build your store.

    Related reading:

  • How to Get Your First 100 D2C Orders (No Budget)

    How to Get Your First 100 D2C Orders (No Budget)

    The first 100 orders are the hardest. You have no reviews, no social proof, no brand recognition, and no data to optimize anything. Every order feels like pulling teeth.

    Most guides say “run Facebook ads” or “partner with influencers.” Both require money you probably don’t have (or shouldn’t be spending) at this stage. Here’s what actually works to get your first 100 orders with minimal budget.

    Phase 1: Your Inner Circle (Orders 1-20)

    Start With People Who Trust You

    Your first 20 orders should come from people who already know you — friends, family, former colleagues, college batchmates. This isn’t charity; it’s your testing phase.

    • Send personal WhatsApp messages (not broadcast) to 50-100 people. “Hey, I’ve launched [brand]. Would love your honest feedback. Here’s a 20% friends-and-family discount.”
    • Post on your personal Instagram/Facebook — Not as an ad, but as a genuine announcement. Share the story behind why you started.
    • LinkedIn post — If your product has a professional angle (productivity, office snacks, professional attire), LinkedIn personal posts get surprising reach.

    The goal isn’t revenue. It’s to get real products into real hands, collect honest feedback, identify any fulfillment issues, and most importantly — get your first 10-20 genuine reviews.

    Phase 2: Communities and Groups (Orders 20-50)

    Go Where Your Customers Already Hang Out

    Indian consumers are active in niche communities. Find yours and add value before selling:

    • Facebook Groups — Groups like “Indian Skincare Addicts” (350K members), “Saree Love” (200K+), “Indian D2C Community,” cooking groups, parenting groups. Answer questions, share knowledge, then naturally mention your product when relevant.
    • Reddit — r/IndianSkincareAddicts, r/IndianFashionAddicts, r/India. Be helpful first. Blatant promotion gets banned.
    • WhatsApp groups — Local community groups, alumni groups, hobby groups. Share your launch story.
    • Telegram channels — Niche product channels have engaged audiences looking for new brands.

    Important: Don’t spam. Spend 2 weeks being genuinely helpful in the community before mentioning your product. People buy from people they trust, and trust takes time — even online.

    Offer a “Founding Customer” Deal

    Create urgency and exclusivity: “First 50 customers get 30% off + free shipping + a handwritten thank-you note.” This works because:

    • People love being early adopters
    • The discount justifies buying from an unknown brand
    • Scarcity (“first 50 only”) drives action

    Phase 3: Content and Organic (Orders 50-100)

    Instagram Reels (₹0 Budget)

    Post 1-2 Reels per day showing:

    • Behind the scenes — Packing orders, sourcing materials, your workspace. People love watching the process.
    • Product demos — How to use, how it looks, results after using
    • Customer reactions — Screen recordings of happy WhatsApp messages (with permission)
    • Founder journey — Why you started, what you’re learning, honest updates about the business

    Organic Reels can reach 5,000-50,000 people per video. At a 0.5% conversion rate on a viral Reel (10K views), that’s 50 website visits and potentially 1-3 orders — for free.

    Micro-Influencer Barter (₹0 Cash, Just Product Cost)

    Forget mega-influencers. Find 10-20 creators with 1,000-10,000 followers in your niche. Send them your product for free in exchange for an honest review post.

    How to find them:

    • Search Instagram hashtags related to your product
    • Look for people who already review similar products
    • Check engagement rate (likes ÷ followers should be above 3%)
    • DM them: “Love your content! I just launched [product]. Would you be open to trying it and sharing your honest experience? No strings attached.”

    Expected result: 2-5 orders per micro-influencer post. 15 creators × 3 orders = 45 orders. At a product cost of ₹250 each, that’s ₹3,750 for 45 orders — a CAC of ₹83.

    Google My Business + Local SEO

    If you have any physical presence (even a home office), set up Google My Business. Post product photos, collect Google reviews from early customers, and optimize for “[product] near me” searches. This is completely free and drives surprisingly good traffic for location-based products.

    The First 100 Orders Timeline

    WeekChannelExpected OrdersCost
    Week 1-2Friends, family, personal network15-25₹0 (just product cost)
    Week 2-3Facebook/WhatsApp groups, Reddit10-20₹0
    Week 3-4Instagram Reels (organic)5-15₹0
    Week 3-5Micro-influencer barter20-45₹2,500-5,000 (product cost)
    Week 4-6Small Meta ad test (₹200-300/day)10-20₹3,000-5,000
    Total60-125 orders₹5,500-10,000

    That’s a CAC of ₹44-167 for your first 100 orders — far better than the ₹350+ CAC most brands pay when they jump straight to Meta ads.

    What to Do With Your First 100 Customers

    These customers are gold. Treat them accordingly:

    1. Collect reviews religiously — WhatsApp each customer 3 days after delivery asking for a photo review. Aim for 50+ reviews before spending on ads.
    2. Add them to WhatsApp broadcast — Your first 100 customers become your product testing panel, early sale audience, and word-of-mouth engine.
    3. Ask for referrals — “Know someone who’d love this? Share this link and you both get ₹100 off.” Referral CAC is typically ₹50-100.
    4. Study their data — Where are they located? What age group? Which creative/channel brought them? This data shapes your paid ad strategy.
    5. Over-deliver on experience — Handwritten thank-you notes, surprise samples, faster shipping. Your first 100 customers become your brand ambassadors.

    Common Mistakes at the 0-100 Stage

    • Spending ₹50K on ads before having reviews — You’re sending cold traffic to a store with zero social proof. Fix that first.
    • Obsessing over website design — A clean, fast, mobile-friendly store with good product photos is enough. Don’t spend 3 months on the perfect theme.
    • Pricing too low to “attract” customers — Low prices attract deal-seekers who never return. Price at your target margin from day one.
    • Ignoring COD — In India, you must offer COD to access Tier 2/3 customers. Set up COD verification from the start.
    • Not tracking unit economics — Even at 100 orders, know your contribution margin. If you’re losing money per order, more orders just means more losses.

    Ready to Launch Your D2C Brand?

    At Growww Tech, we help Indian D2C brands go from zero to launch — Shopify store setup, payment integration, shipping setup, and launch strategy. If you’re ready to make your first 100 sales, let’s build it together.

    Related reading:

  • Meta Ads on ₹500/Day — What’s Actually Possible

    Meta Ads on ₹500/Day — What’s Actually Possible

    “I have ₹15,000/month for ads. Can I build a brand with this?”

    The honest answer: yes, but with realistic expectations. You won’t build a ₹50 lakh/month business on ₹500/day. But you can validate your product, find winning creatives, and build the foundation for scaling — if you spend smartly.

    Here’s what ₹500/day actually gets you in 2026, with real benchmarks from Indian D2C campaigns we’ve managed.

    The Realistic Numbers at ₹500/Day

    Metric Best Case Average Case Worst Case
    Daily spend ₹500 ₹500 ₹500
    CPM (cost per 1,000 impressions) ₹80-120 ₹150-250 ₹300-400
    Daily reach 4,000-6,000 2,000-3,300 1,250-1,600
    CTR (click-through rate) 2-3% 1-1.5% 0.5-0.8%
    Daily link clicks 80-180 20-50 6-13
    Conversion rate (landing page) 3-4% 1.5-2% 0.5-1%
    Daily orders 2-7 0.3-1 0-0.1
    Monthly orders 60-210 9-30 0-3
    CAC (cost per acquisition) ₹70-250 ₹500-1,600 ₹5,000+
    ROAS 4-14x 0.6-2x Below 0.2x

    The gap between best and worst case is massive. The difference? Creative quality and product-market fit. Not targeting, not budget, not bidding strategy — creative.

    Why ₹500/Day Is Actually a Disadvantage (And How to Overcome It)

    The Learning Phase Problem

    Meta’s algorithm needs 50 conversion events per week per ad set to optimize properly. At ₹500/day with a ₹350 CAC, you get ~1.4 conversions/day = ~10/week. The algorithm never exits the learning phase.

    The fix: Optimize for a higher-funnel event. Instead of optimizing for “Purchase,” optimize for “Add to Cart” or “Initiate Checkout.” You’ll get 3-5x more events per day, giving the algorithm enough data to learn.

    Once you’ve identified winning creatives and audiences through ATC optimization, shift to Purchase optimization at a higher budget (₹1,500-2,000/day).

    The Testing Limitation

    At ₹500/day, you can realistically test 2-3 ad creatives per week. That’s slow. Brands spending ₹5,000/day can test 10-15 creatives simultaneously and find winners faster.

    The fix: Be ruthless with testing. Run each creative for exactly 3 days. If CTR is below 1% after ₹500 spend, kill it. Don’t give underperformers more time — the data is clear enough at that point.

    The ₹500/Day Playbook (Week by Week)

    Week 1-2: Creative Testing

    • Budget: ₹500/day, single ad set with Advantage+ audience
    • Objective: Traffic or Add to Cart (not Purchase)
    • Creatives: Test 3-4 different formats — UGC video, founder-face video, before/after carousel, problem-agitate-solve Reel
    • Audience: Broad (let Meta find the audience). Add 1-2 interest signals max.
    • Goal: Find 1-2 creatives with CTR above 1.5% and CPC below ₹10

    Week 3-4: Scaling Winners

    • Budget: Shift entire ₹500/day to the winning creative
    • Objective: Switch to Add to Cart or Purchase optimization
    • Create 3 variations of the winner (different hooks, same format)
    • Add retargeting: ₹100/day to retarget Add-to-Cart abandoners with a discount offer
    • Goal: Get CAC below ₹400 on a ₹999 product

    Week 5-8: Optimize and Expand

    • Refresh creatives every 2 weeks — Creative fatigue hits fast at low budgets
    • Test new angles: Seasonal hooks, testimonial-based ads, comparison content
    • Build lookalike audiences from your ATC and Purchase data (needs 100+ events)
    • Goal: Sustain 1.5-2.5x ROAS while building customer list for retention

    The Creative Formats That Work at Low Budgets

    At ₹500/day, you can’t afford to waste money on creatives that don’t stop the scroll. These formats consistently outperform for Indian D2C:

    1. UGC-style Reels (15-30 sec) — Customer holding the product, speaking to camera. Raw, authentic, shot on phone. Outperforms studio content 3-5x on average.
    2. Problem → Fix hook — First 3 seconds state the pain point. “Tired of your moisturizer leaving white patches?” → Show your product solving it.
    3. Founder story — “I started this brand because [relatable frustration].” Works incredibly well for first-time D2C brands building trust.
    4. Before/After — Especially powerful for skincare, fitness, home decor. Must be genuine — fake before/afters get flagged and destroy trust.
    5. Unboxing + first impression — Have a real customer film their unboxing reaction. Costs ₹0 if you ask nicely (offer a free product).

    What doesn’t work: Static product images on white backgrounds, generic “Shop Now” text overlays, and overly polished studio video that looks like a TV commercial. These look like ads, and people scroll past ads.

    When to Increase Budget Beyond ₹500/Day

    Scale your budget when ALL of these are true:

    • You have at least 2 proven creatives with consistent CTR above 1.5%
    • Your CAC is below 30% of your product price (e.g., below ₹300 on a ₹999 product)
    • Your landing page converts at 1.5%+ (if it’s below 1%, fix the page before spending more)
    • You have a retention strategy (WhatsApp, email) so repeat purchases bring down effective CAC

    Scale gradually: ₹500 → ₹800 → ₹1,200 → ₹1,500 → ₹2,000. Increase by 20-30% every 3-4 days. Never double budget overnight — the algorithm needs time to adjust.

    ₹500/Day Isn’t Enough? Here’s What Else to Do

    If ₹500/day is truly your ceiling, don’t rely on ads alone. Build parallel organic channels:

    • Instagram Reels (organic) — Post the same content you’d run as ads. 1-2 Reels/day. Costs ₹0 and compounds over time.
    • SEO blog content — One well-written blog post per week targeting buyer-intent keywords. Takes 3-6 months to rank but delivers free traffic forever.
    • WhatsApp community — Build a group of 100-500 engaged customers. Drop new products and offers there first. Free, instant, high-conversion channel.
    • Micro-influencer barter — Send free products to 10-20 creators with 1K-10K followers in exchange for honest reviews. Cost: just the product. ROI: 2-5 orders per creator on average.

    The smartest Indian D2C brands use ads as one channel, not the only channel. 50% of top brand traffic is now organic.

    Need Help With Your Ad Strategy?

    At Growww Tech, we manage Meta and Google ad campaigns for Indian D2C brands — from ₹500/day testing phases to ₹50K/day scale. If your ads aren’t delivering results, get a free ad account audit.

    Related reading:

  • Ecommerce Packaging on ₹25/Box — Branded Unboxing

    Ecommerce Packaging on ₹25/Box — Branded Unboxing

    “Customers compare my packaging to Amazon’s. They expect branded boxes, tissue paper, thank-you cards — but custom packaging costs ₹100+ per order and I sell at ₹999.”

    This is the packaging dilemma every Indian D2C founder faces. Your unboxing experience is the first physical touchpoint with your brand. A plain brown corrugated box screams “cheap.” But premium packaging at ₹100-150/order on a ₹999 product destroys your unit economics (that’s 10-15% of revenue gone on the box alone).

    The sweet spot exists: ₹25-50 per order for a packaging experience that feels premium. Here’s exactly how to achieve it.

    The Packaging Cost Breakdown

    Component Budget Option Premium Option Sweet Spot
    Outer box Plain corrugated (₹8-12) Custom printed (₹80-150) Plain box + branded tape (₹15-20)
    Inner protection Newspaper (₹0) Custom tissue paper (₹15-20) Butter paper or shredded paper (₹3-5)
    Brand touchpoint None (₹0) Custom printed insert card (₹8-12) Sticker + thank-you card (₹3-5)
    Tape Plain brown (₹1) Custom printed tape (₹3-5) Branded tape (₹3-5)
    Extra touches None Ribbon, samples, freebies (₹20-50) Small sample sachet (₹5-10)
    Total per order ₹9-13 ₹123-237 ₹26-45

    The ₹25-50 Packaging Playbook

    1. Branded Tape (₹3-5 per order) — The Highest-ROI Packaging Upgrade

    Skip the custom printed box. Instead, use a plain corrugated box (₹10-15) with custom branded tape. Your brand name and logo on tape costs ₹3-5 per meter at 500+ rolls. It rebuilds a generic brown box into a branded package the moment the customer sees it.

    Where to order: IndiaMart and TradeIndia have hundreds of custom tape manufacturers. Minimum order: 50-100 rolls. Lead time: 7-10 days. Cost: ₹80-120 per roll (30m).

    2. Brand Sticker on the Box (₹1-2 per sticker)

    A round or rectangular sticker with your logo on the box flap is simple, cheap, and effective. Order vinyl or matte stickers in bulk. At 1,000+ quantity, they cost ₹1-2 each.

    Place it where it seals the box — it’s the first thing the customer sees when they’re about to open.

    3. Thank-You Card with a Purpose (₹2-4 per card)

    Don’t just say “Thank you for your order.” Make the insert card work for your business:

    • Side 1: A genuine thank-you message from the founder + brand story (2-3 lines)
    • Side 2: A QR code to your website with a discount code (“Get 15% off your next order”) + WhatsApp number for support + social media handles

    This card drives repeat purchases, WhatsApp opt-ins, and social follows. A ₹3 card that generates even one repeat order is the best ROI in your packaging.

    Print source: Vistaprint, PrintStop, or local printers. 500 cards: ₹1,000-2,000 (₹2-4 each).

    4. Inner Wrapping: Butter Paper or Shredded Paper (₹3-5)

    Ditch newspaper (looks cheap) and expensive tissue paper. Use:

    • Butter paper (food-grade) — Clean, white, slightly translucent. Looks premium. ₹2-3 per sheet. Great for clothing and accessories.
    • Shredded crinkle paper — Available in kraft brown or colored. ₹200-300 per kg (enough for 50-80 orders). Creates that “unboxing” feel.
    • Honeycomb paper wrap — The trendy eco-friendly option. ₹3-5 per order. Instagram-worthy and doubles as protection.

    5. Product Samples or Small Freebies (₹5-15)

    If you sell consumable products (skincare, food, supplements), include a sample of another product in your range. This costs you ₹5-15 (sachet cost) but can drive a full-price purchase worth ₹500-1,500.

    For non-consumable products, a small unexpected gift (branded bookmark, mini sticker sheet, fridge magnet) creates delight. Keep it under ₹10 and relevant to your brand.

    When to Upgrade to Custom Boxes

    Custom printed corrugated boxes make financial sense when:

    • You’re doing 500+ orders/month — At this volume, custom box costs drop to ₹40-60 each (vs ₹80-150 at low volume)
    • Your AOV is above ₹1,500 — The packaging cost as a percentage of order value becomes acceptable (3-4%)
    • You sell premium/gifting products — Jewelry, premium skincare, gift boxes — these categories demand premium packaging
    • Unboxing is part of your marketing — If you’re getting UGC unboxing videos, invest in the visual

    Until then, the ₹25-50 playbook creates 80% of the premium experience at 30% of the cost.

    Packaging Suppliers for Indian D2C Brands

    Component Supplier Minimum Order Cost
    Corrugated boxes IndiaMart, Packman, BoxMyPack 100 boxes ₹8-15 per box
    Custom tape IndiaMart, Alibaba 50 rolls ₹80-120 per roll
    Brand stickers StickerGiant, Vistaprint, local 500 stickers ₹1-3 per sticker
    Thank-you cards Vistaprint, PrintStop 250 cards ₹2-5 per card
    Butter/tissue paper Amazon Business, IndiaMart 500 sheets ₹2-4 per sheet
    Crinkle paper Amazon Business, local 1 kg ₹200-350 per kg
    Poly mailers (lightweight) Packman, Amazon Business 100 pieces ₹4-8 per mailer

    Eco-Friendly Packaging: Worth the Premium?

    Eco-conscious packaging (recycled materials, compostable mailers, soy-based inks) costs 20-40% more but resonates with urban, premium customers. If your target audience is metro millennials buying ₹1,500+ products, it’s worth considering.

    Budget-friendly eco options:

    • Kraft paper (already eco) — Brown corrugated boxes are recyclable by default
    • Paper tape instead of plastic — ₹1-2 more per order
    • Cornstarch mailers — ₹6-10 each (vs ₹4-6 for plastic poly mailers)
    • “This packaging is recyclable” sticker — Costs ₹0.50, signals values

    Packaging is the cheapest brand asset you have

    The unboxing moment converts more repeat customers than your homepage ever will — for ₹25/box, not ₹150. Most brands underspend the first 6 months on this and over-spend later trying to fix retention with discounts. We’ve helped 200+ Indian D2C brands wire packaging into the post-purchase flow. ₹385Cr+ revenue processed. 4.5x average ROI. 98% retention.

    The Shopify build is ₹50,000 fixed-price with no AMC — bug fixes for what we ship are included for the lifetime of the store. Post-purchase experience design (thank-you cards, branded tracking, reorder reminders, NPS triggers) is wired in by default.

    Start a WhatsApp chat: Message the Growww Tech team on WhatsApp →

    Related reading:

  • Return Fraud Is Killing Indian D2C — How to Fight Back

    Return Fraud Is Killing Indian D2C — How to Fight Back

    “A customer ordered a saree worth ₹2,500. She wore it to a wedding (we could see the sindoor stain), then returned it claiming ‘wrong color.’ Flipkart approved the return automatically.”

    This founder’s story isn’t unusual. Return fraud — where customers abuse return policies for free products, and competitors place bulk orders to drain your logistics budget — is one of the most underreported problems in Indian ecommerce.

    For D2C brands selling on their own websites, the problem is even worse because you eat the entire cost — there’s no marketplace to share the loss with.

    The 4 Types of Return Fraud Hitting Indian D2C Brands

    1. Wardrobing (Use and Return)

    The customer uses the product — wears the clothing, uses the electronics, applies the skincare — then returns it claiming a defect or “not as expected.” Fashion brands are hit hardest: industry estimates suggest 15-20% of fashion returns show signs of use.

    2. Empty Box / Wrong Item Returns

    Customer receives the product, returns an empty box or a completely different (cheaper) item. Since return pickups often happen without verification, the brand discovers the fraud days later when the return reaches the warehouse.

    3. Competitor Sabotage

    Competitors (or their hired hands) place bulk COD orders with fake addresses to drain your inventory and logistics budget. This is especially common in competitive fashion, beauty, and supplements categories. We covered this in detail in our COD fake orders guide.

    4. Refund Fraud

    Customer claims they never received the delivery (when they did), or says the product was damaged in transit (when it wasn’t). They get a refund while keeping the product. This is harder to prove and often written off as a cost of doing business.

    What Return Fraud Actually Costs You

    For a brand doing 2,000 orders/month with a 20% return rate and 25% of returns being fraudulent:

    CostPer Fraudulent ReturnMonthly (100 fraud returns)
    Product cost (unsellable)₹250-400₹25,000-40,000
    Forward shipping (wasted)₹60-80₹6,000-8,000
    Return shipping₹50-70₹5,000-7,000
    Refund processing₹20-30₹2,000-3,000
    QC and repackaging labor₹15-25₹1,500-2,500
    Total monthly fraud loss₹39,500-60,500

    That’s ₹4.7-7.3 lakh/year lost to return fraud alone. And this is a conservative estimate for a small-to-medium D2C brand.

    8 Tactics to Prevent Return Fraud

    1. Add Tamper-Evident Tags to Products

    Attach a tag that must be removed to use the product (like clothing security tags, but simpler). Your return policy states: “Returns accepted only with intact tamper tag.” If the tag is removed, the product was used — return denied.

    Cost: ₹2-5 per tag. This single change eliminates most wardrobing fraud.

    2. Video Proof for Return Claims

    For products above ₹1,000, require customers to upload a short video showing the defect when requesting a return. This eliminates false damage claims and makes fraudsters think twice.

    Implement this through your return portal or via WhatsApp: “To process your return, please send a 30-second video showing the issue with the product.”

    3. Photograph Every Outgoing Package

    Before sealing, photograph the product inside the package with the shipping label visible. This creates evidence against empty box claims. Many 3PL warehouses already do this — if yours doesn’t, insist on it.

    For high-value items (₹2,000+), record a video of packing with a weight check visible.

    4. Weight Verification on Returns

    Record the weight of every outgoing package. When a return arrives, weigh it before opening. If the return package weighs significantly less than the original, flag it immediately — likely an empty box or wrong item swap.

    5. Return Window Strategy

    Don’t offer the same return window for all products:

    • Fashion/apparel: 7-day exchange only (no refund for “didn’t like it”)
    • Electronics/gadgets: 10-day return with original packaging required
    • Skincare/beauty: No return on opened products (only for sealed/defective)
    • Food products: No return (perishable — offer replacement for damage only)

    Short return windows reduce wardrobing. Category-specific policies show customers you’ve thought this through.

    6. Blacklist Serial Returners

    Track return rates by customer. If a customer returns more than 40-50% of their orders, restrict them:

    • Flag their account for manual review on future returns
    • Remove COD option (force prepaid only)
    • In extreme cases, block the account from ordering

    This sounds harsh, but a customer who returns 8 out of 10 orders is costing you money on every transaction. They’re not a customer — they’re a liability.

    7. Exchange Over Refund

    Default to exchange, not refund. When a customer initiates a return, offer: “Would you like to exchange for a different size/color? Exchange is free!”

    Genuine customers often want a different variant. Fraudsters want money back — they’ll drop the return request if only exchange is offered. This single policy change can reduce return rates by 15-25%.

    8. QC Process for All Returns

    Never process a refund before inspecting the returned product. Establish a standard QC checklist:

    1. Verify the correct product was returned (match SKU)
    2. Check for signs of use (stains, scratches, opened seals)
    3. Verify all accessories/components are included
    4. Photograph the returned item’s condition
    5. Only then process the refund

    If QC finds the product was used or damaged by the customer, deny the refund with photographic evidence. Be prepared for the customer to complain on social media — but having documentation protects you.

    Return Policy Template for Indian D2C Brands

    Here’s a fair-but-firm return policy framework:

    • 7-day return/exchange window from delivery date
    • Original packaging required with all tags intact
    • Tamper tag must be unbroken for clothing/accessories
    • Photo/video proof required for damage/defect claims on items above ₹1,000
    • Exchanges are free; refunds incur ₹50-100 processing fee (or free if genuinely defective)
    • No returns on: opened cosmetics, innerwear, perishables, personalized items
    • Refund processed within 7 business days of QC approval

    Display this prominently on product pages and at checkout. Transparency prevents disputes.

    If returns are eating margin, the policy needs structural teeth

    Return-fraud defence runs on three layers: tight return policy with photo/video proof, QC at warehouse before refund, and pincode-level blacklists for repeat offenders. We bake all of it into every Shopify build for Indian D2C brands. ₹385Cr+ revenue processed. 4.5x average ROI. 98% retention.

    The Shopify build is ₹50,000 fixed-price with no AMC — bug fixes for what we ship are included for the lifetime of the store. Active return-management automation sits on the optional ₹30K/month Growth Retainer.

    Start a WhatsApp chat: Message the Growww Tech team on WhatsApp →

    Related reading:

  • Amazon Takes 30% — Worth Building Your Own Site? (Math)

    Amazon Takes 30% — Worth Building Your Own Site? (Math)

    “After Amazon’s referral fee, closing fee, FBA charges, and advertising — I make ₹50 on a ₹500 product. Is this even worth it?”

    This is the most common frustration we hear from Indian ecommerce sellers. And the instinctive reaction is: “I’ll build my own website and keep all the margin!”

    But it’s not that simple. Your own website has different costs — and they’re not always cheaper. Let’s do the honest math.

    What Amazon and Flipkart Actually Take

    Let’s break down the real fees for a ₹999 product sold on Amazon India:

    Fee ComponentAmount (₹)% of Sale
    Referral fee (category-dependent)₹100-17010-17%
    Closing fee (based on price slab)₹25-652.5-6.5%
    FBA fee (if using Fulfillment by Amazon)₹60-1206-12%
    Weight handling₹30-503-5%
    GST on fees (18%)₹40-704-7%
    TCS (0.5% on net)₹50.5%
    Total marketplace fees₹260-48026-48%

    That’s before advertising. Amazon Sponsored Products ads typically add another 8-15% of revenue (ACoS) for competitive categories. So the true cost of selling on Amazon can be 35-55% of your selling price.

    Flipkart’s fee structure is similar, sometimes slightly lower on referral fees but with comparable total take-rates. Meesho takes less (0% commission on many categories) but delivers lower AOV and a different customer profile.

    What Your Own D2C Website Actually Costs

    Now let’s look at the same ₹999 product sold through your own Shopify store:

    Cost ComponentAmount (₹)% of Sale
    Shopify subscription (₹2,500/month ÷ 300 orders)₹80.8%
    Payment gateway (Razorpay/Cashfree ~2%)₹202%
    Shipping (Shiprocket, 500g metro)₹50-755-7.5%
    Meta/Google ads (CAC ₹250-400)₹250-40025-40%
    Shopify apps₹20-402-4%
    RTO cost allocation (25% COD RTO)₹45-854.5-8.5%
    Total D2C website costs₹393-62839-63%

    Wait — the D2C website costs MORE?

    Often, yes — especially for new brands. The critical difference is where the money goes:

    • Marketplace fees go to Amazon/Flipkart. You get traffic but no customer data, no brand building, no relationship.
    • D2C costs go toward building YOUR brand’s traffic, YOUR customer list, YOUR brand recognition. The ₹350 CAC on the first order becomes ₹0 on the second order from the same customer.

    The Real Answer: It Depends on Your Stage

    Stage 1: Just Starting (0-100 orders/month) → Marketplace First

    If you’re brand new with zero brand recognition, marketplaces give you something your website can’t: built-in traffic from day one. Amazon India has 300+ million monthly visitors. Your Shopify store has zero until you drive traffic there.

    Start on Amazon/Flipkart to validate product-market fit, gather reviews, and generate initial revenue. Use this phase to understand your customer, refine your product, and build a reviews base you can showcase later.

    Stage 2: Growing (100-1,000 orders/month) → Both, But Shift Toward D2C

    Once you’re getting consistent sales, launch your own website. Use marketplace profits to fund your initial D2C customer acquisition. The goal: get D2C to 30-40% of total revenue.

    Key tactics at this stage:

    • Include inserts in marketplace orders directing customers to your website (“Get 15% off your next order at oursite.com”)
    • Build your email and WhatsApp list from every touchpoint
    • Start content marketing and SEO (this compounds over 6-12 months)
    • Run Meta ads to your website, not to marketplace listings

    Stage 3: Scaling (1,000+ orders/month) → D2C Primary, Marketplaces as Channel

    At scale, your D2C website should be 50-60% of revenue. Marketplaces become a distribution channel — not your lifeline. The math shifts dramatically once you have:

    • Organic traffic (50% of top D2C brand traffic is organic) — free customer acquisition
    • Repeat customers (zero CAC on 2nd, 3rd, 4th purchase) — compounds margin
    • WhatsApp/email list — direct channel to customers at near-zero cost
    • Brand recognition — customers search for you by name, not by category

    The Unit Economics Comparison: Year 1 vs Year 2

    MetricAmazon (Year 1)Amazon (Year 2)D2C Website (Year 1)D2C Website (Year 2)
    Effective cost per order35-45%35-45%40-60%20-30%
    Customer data ownedNoNoYesYes
    Repeat purchase costSame fees againSame fees againNear zero (WhatsApp/email)Near zero
    Brand equity builtMinimalMinimalGrowingStrong
    Pricing controlLimited (price matching)LimitedFullFull

    The key insight: Amazon’s costs are linear (same percentage on every order, forever). D2C costs are front-loaded (high CAC initially, then declining as organic traffic and repeat purchases kick in).

    5 Rules for the Marketplace-to-D2C Transition

    1. Never abandon marketplaces completely — Even profitable D2C brands keep 20-30% marketplace revenue as a discovery channel.
    2. Differentiate your D2C offering — Exclusive products, bundles, or better pricing on your website gives customers a reason to buy direct.
    3. Invest in SEO early — Content and SEO take 6-12 months to compound. The brand that starts SEO today will have free traffic in 2027.
    4. Build your owned audience — Every marketplace sale without capturing the customer’s email/WhatsApp is a missed opportunity.
    5. Track unit economics separately — Don’t mix marketplace and D2C P&L. Understand each channel’s true contribution margin.

    Need Help Building Your D2C Website?

    At Growww Tech, we help Indian brands transition from marketplace-only to a healthy D2C + marketplace mix. From Shopify store setup to ad strategy to SEO — we build the foundation that makes your own website more profitable than Amazon. Let’s talk about your brand.

    Related reading:

  • WhatsApp Marketing for D2C — 95% Open Rate Setup

    WhatsApp Marketing for D2C — 95% Open Rate Setup

    “Email open rates in India are 15-18%. WhatsApp open rates are 95%. Why is everyone still spending on email tools?”

    This question from a D2C founder in a Slack group sparked a heated debate. The answer? You need both — but if you’re an Indian D2C brand and you haven’t set up WhatsApp automation yet, you’re leaving the easiest money on the table.

    WhatsApp has 500+ million users in India. Your customers already use it 25+ times a day. They open your message within minutes, not hours. And for ecommerce-specific use cases — cart recovery, COD verification, reorder reminders — nothing else comes close.

    Why WhatsApp Beats Email and SMS for Indian D2C

    MetricWhatsAppEmailSMS
    Open rate95%15-18%90%+ (but declining)
    Click-through rate15-25%2-3%5-8%
    Cart recovery rate25-30%5-10%8-12%
    Cost per message₹0.30-0.80₹0.01-0.05₹0.10-0.25
    Rich media supportImages, video, buttons, catalogsHTML (often broken on mobile)Text only
    Two-way conversationYes (native)RareLimited

    The cost per message is higher than email, but the revenue per message is 5-10x higher. A WhatsApp cart recovery message that costs ₹0.50 and recovers a ₹999 order is infinitely better than a free email that gets ignored.

    The 5 WhatsApp Flows Every D2C Brand Needs

    1. Abandoned Cart Recovery (Revenue Impact: Highest)

    74% of Indian ecommerce carts are abandoned. At ₹999 average order value and 1,000 abandoned carts/month, that’s ₹7.4 lakh in potential revenue walking away. WhatsApp recovers 25-30% of these.

    The flow:

    1. 30 minutes after abandonment — “Hey [Name], you left [Product] in your cart! Here’s a quick link to complete your order: [link]. Need help deciding? Reply here!”
    2. 4 hours later (if no purchase) — “Still thinking about [Product]? Here’s what our customers say: [review screenshot]. Complete your order before it sells out!”
    3. 24 hours later (if no purchase) — “Last chance! Get ₹50 off [Product] with code COMEBACK50. Valid for 24 hours only: [link]”

    Expected recovery rate: 25-30% of abandoned carts. On 1,000 abandoned carts at ₹999 AOV, that’s ₹2.5-3 lakh/month in recovered revenue.

    2. COD Order Verification (Cost Impact: Highest)

    We covered this in detail in our COD fake orders guide and RTO reduction playbook. The short version: automatically send a WhatsApp confirmation for every COD order. No confirmation within 12 hours = auto-cancel.

    Impact: 25-40% reduction in fake COD orders and RTO.

    3. Order Updates & Tracking (Experience Impact: Highest)

    Replace generic SMS tracking with rich WhatsApp messages:

    • Order confirmed — Product image + order details + expected delivery date
    • Shipped — Tracking link + courier name + delivery estimate
    • Out for delivery — “Your order arrives today! Be available at [address]”
    • Delivered — “Hope you love it! Share a photo and get ₹100 off your next order”

    This reduces “Where is my order?” (WISMO) customer support queries by 40-60%. It also builds trust and sets up the post-purchase engagement flow.

    4. Post-Purchase Engagement & Review Collection

    3-5 days after delivery:

    “Hi [Name]! How’s your [Product]? We’d love your honest feedback. Tap here to leave a quick review: [link]. As a thank you, get 10% off your next order!”

    This message typically gets a 15-25% review submission rate — far higher than email review requests (3-5%). More reviews = more social proof = higher conversion on product pages.

    5. Reorder Reminders & Broadcasts

    For consumable products (food, skincare, supplements), set up automatic reorder reminders based on typical usage:

    • Skincare (30-day supply) — Send reminder on day 25
    • Coffee/tea (15-day supply) — Send reminder on day 12
    • Supplements (30-day supply) — Send reminder on day 27 with auto-reorder link

    For non-consumable products, use broadcast campaigns for new launches, flash sales, and seasonal promotions. Keep frequency to 2-4 broadcasts/month maximum — more than that and customers block you.

    WhatsApp Business API: Which Tool to Use

    You need a WhatsApp Business API provider (not the free WhatsApp Business app — that doesn’t support automation at scale). Here are the top options for Indian D2C brands:

    ToolMonthly CostBest ForShopify Integration
    Interakt₹999-3,499All-in-one (cart recovery + COD + broadcasts)Native app
    AiSensy₹999-2,999Budget brands, simple automationVia API
    KwickReply₹799-2,499Shopify-first Indian storesNative app
    Wati₹2,499-4,999Team inbox + advanced chatbotsNative app
    GoKwik₹2,000-5,000COD verification + RTO reductionNative app

    Our recommendation: Start with Interakt (best balance of features and price) or KwickReply (if you’re on Shopify and want the simplest setup). Add GoKwik separately if COD verification is your primary need.

    Setting Up WhatsApp Marketing: Step by Step

    1. Get a dedicated business phone number — Don’t use your personal number. Get a new number specifically for WhatsApp Business API.
    2. Apply for WhatsApp Business API via your chosen provider (Interakt/Wati/etc). Approval takes 1-3 business days.
    3. Create message templates — WhatsApp requires pre-approved templates for outbound messages. Submit templates for: cart recovery, order confirmation, shipping update, COD verification, review request, and reorder reminder.
    4. Connect to Shopify — Install the provider’s Shopify app and connect your store. This triggers automation based on Shopify events (new order, abandoned cart, fulfillment).
    5. Set up automation flows — Configure triggers, timing, and message sequence for each flow.
    6. Build your opt-in list — Add WhatsApp opt-in checkbox at checkout. Customers must consent to receive marketing messages.
    7. Test thoroughly — Place test orders, abandon carts, and verify every flow fires correctly before going live.

    WhatsApp Marketing Costs: What to Budget

    WhatsApp Business API pricing (Meta’s charges, on top of your provider’s fee):

    • Marketing messages (broadcasts, promotions): ~₹0.70-0.80 per message
    • Utility messages (order updates, shipping): ~₹0.30-0.35 per message
    • Authentication messages (OTP, verification): ~₹0.25 per message
    • Service conversations (customer-initiated): Free for first 1,000/month

    For a brand doing 2,000 orders/month with 500 abandoned carts:

    FlowMessages/MonthCost/Month
    Cart recovery (3 messages × 500 carts)1,500~₹1,050
    Order updates (3 per order × 2,000)6,000~₹1,950
    COD verification (1,200 COD orders)1,200~₹300
    Review requests (2,000 delivered)2,000~₹1,400
    Reorder reminders500~₹350
    Monthly broadcasts (2×)4,000~₹2,800
    Total Meta charges15,200~₹7,850
    Provider fee (Interakt)~₹2,499
    Grand total~₹10,350

    If cart recovery alone brings back 125-150 orders at ₹999 AOV, that’s ₹1.25-1.5 lakh in recovered revenue — a 12-15x ROI on your WhatsApp spend.

    Common WhatsApp Marketing Mistakes

    • Over-messaging — More than 4 broadcast campaigns/month leads to high block rates. Quality over quantity.
    • Generic messages — “Check out our new collection!” gets ignored. “The moisturizer you loved is back in stock — 15% off for 24 hours” converts.
    • No opt-out option — Always include “Reply STOP to unsubscribe.” Not doing this violates WhatsApp’s policies and gets your number banned.
    • Using personal WhatsApp — The free WhatsApp Business app doesn’t support automation, analytics, or team inbox. You need the API for any serious marketing.
    • Not segmenting — Sending the same broadcast to all customers. Segment by: purchase history, last order date, order value, product category.

    If you’re not on WhatsApp Business API yet, the recovery money is sitting on the table

    Cart recovery + COD verification + reorder reminders + post-purchase support flows — every Shopify build we ship has the WhatsApp Business API wired in by day one. The 95% open rate is real. We’ve done it for 200+ Indian D2C brands. ₹385Cr+ revenue processed. 4.5x average ROI. 98% retention.

    The Shopify build is ₹50,000 fixed-price with no AMC — bug fixes for what we ship are included for the lifetime of the store. Active WhatsApp campaign management sits on the optional ₹30K/month Growth Retainer.

    Start a WhatsApp chat: Message the Growww Tech team on WhatsApp →

    Related reading:

  • Best Shopify Apps for Indian Stores — The 7 You Need

    Best Shopify Apps for Indian Stores — The 7 You Need

    “My Shopify app subscriptions cost more than my team member’s salary.”

    This line from a Reddit post in r/IndianStartups got 200+ upvotes — because every Indian D2C founder on Shopify has felt this pain. You start with a basic store, add one app for reviews, another for COD, another for WhatsApp, another for SEO, another for upsells… and suddenly you’re paying ₹12,000-18,000/month in app fees before you’ve shipped a single order that day.

    Here’s the truth: most Shopify stores need only 5-7 apps. Everything else is nice-to-have bloat that slows your site, complicates your stack, and drains your margins.

    The Problem: App Bloat Is Killing Your Store

    Every Shopify app you install:

    • Adds JavaScript to your storefront — Each app typically adds 50-200KB of JS. Five apps = 250KB-1MB of extra JavaScript your mobile customers have to download on spotty 4G connections.
    • Slows page load time — 78% of Indian D2C traffic is mobile. Every 1-second delay in load time reduces conversions by 7%. A store with 15 apps is often 2-3 seconds slower than one with 5.
    • Creates dependency hell — Apps conflict with each other, break during Shopify updates, and make theme customization a nightmare.
    • Costs real money — ₹15,000/month in apps = ₹1.8 lakh/year. That’s 2-3 months of Meta ad budget.

    The 7 Essential Shopify Apps for Indian D2C Stores

    1. Shipping & Logistics: Shiprocket (₹799-1,999/month)

    Why it’s essential: Connects you to 17+ courier partners, auto-selects cheapest shipping per order, handles COD remittance, NDR management, and tracking page.

    What it replaces: Individual courier integrations, separate tracking apps, manual shipping label generation.

    Alternative: Pickrr (cheaper, fewer features) or direct Delhivery integration (better for 2,000+ orders/month).

    2. COD Management: Releasit COD Form & Upsells (₹700-2,000/month)

    Why it’s essential: After Shopify killed their native Advanced COD app, this is the best replacement. It lets you add COD surcharge (₹30-50), set minimum order value for COD, collect phone number verification, and show upsells at checkout.

    What it replaces: Shopify’s discontinued Advanced COD app, custom COD scripts.

    Alternative: EasyCOD (similar features, slightly cheaper).

    3. Reviews & Social Proof: Judge.me (Free – ₹1,200/month)

    Why it’s essential: Product reviews are the #1 trust signal for Indian online shoppers. Judge.me collects reviews via email/SMS after purchase, displays them on product pages with photos, and adds review structured data for Google rich snippets.

    Why not Loox or Yotpo: Judge.me’s free plan is genuinely usable (unlimited reviews, review request emails). Loox and Yotpo’s free tiers are severely limited, and their paid plans are ₹2,500-5,000/month — overkill for most Indian D2C stores.

    4. WhatsApp Integration: Interakt or KwickReply (₹1,000-3,500/month)

    Why it’s essential: WhatsApp has 95% open rates in India. You need it for abandoned cart recovery (25-30% recovery rate), order confirmation and tracking, COD verification, and post-purchase engagement.

    Interakt is the most popular choice — it handles cart recovery, broadcast campaigns, COD confirmation, and basic chatbot flows. KwickReply is cheaper and specifically built for Shopify India stores.

    What it replaces: Separate cart recovery apps, SMS notification apps, manual WhatsApp messaging.

    5. SEO: Plug in SEO (Free) or SEO Manager (₹1,500/month)

    Why it’s essential: 50% of top D2C brand traffic is now organic. Basic SEO hygiene — meta titles, descriptions, image alt text, structured data, broken link fixing — is table stakes.

    Plug in SEO (free) handles the basics: identifies SEO issues, suggests fixes, checks structured data. For most stores under 100 products, the free version is sufficient.

    What you DON’T need: Paid SEO apps that promise to “boost your rankings” — no app can do that. SEO comes from content, site structure, and backlinks, not from installing an app.

    6. Analytics: Lifetimely (₹1,200-2,500/month) or Free GA4

    Why it’s essential: Shopify’s built-in analytics are basic. You need to understand customer lifetime value (LTV), cohort analysis, and unit economics per product and channel.

    Lifetimely is excellent for D2C brands that want LTV, profit tracking, and cohort reports in one dashboard. If budget is tight, Google Analytics 4 (free) with proper ecommerce tracking gives you 80% of what you need.

    What it replaces: Multiple analytics apps, spreadsheet-based reporting, guessing.

    7. Email Marketing: Klaviyo (Free up to 250 contacts) or Mailchimp

    Why it’s essential: Email is still the highest-ROI marketing channel (₹36 return per ₹1 spent). You need automated flows: welcome series, post-purchase, win-back, and browse abandonment.

    Klaviyo is the gold standard for Shopify email — deep integration, pre-built flows, powerful segmentation. The free plan covers up to 250 contacts and 500 emails/month. Mailchimp is cheaper for larger lists but has weaker Shopify integration.

    What it replaces: Separate email + SMS apps, manual campaign sending.

    Total Cost: The Essential Stack

    AppMonthly CostPurpose
    Shiprocket₹799-1,999Shipping & logistics
    Releasit COD₹700-2,000COD management
    Judge.me₹0-1,200Reviews
    Interakt / KwickReply₹1,000-3,500WhatsApp
    Plug in SEO₹0SEO basics
    GA4 or Lifetimely₹0-2,500Analytics
    Klaviyo (free tier)₹0Email marketing
    Total₹2,500-11,200

    Compare that to the ₹15,000-20,000/month many stores spend. You could save ₹5,000-17,000/month by cutting to essentials.

    Apps You Should Probably Uninstall Today

    If you have any of these, seriously evaluate whether they’re earning their keep:

    • Multiple upsell/cross-sell apps — One is enough. Having Bold Upsell + ReConvert + In Cart Upsell is redundant and creates conflicting popups.
    • Page builder apps — Shopify’s built-in editor (Online Store 2.0) handles most needs. PageFly/Shogun add significant JS bloat.
    • Currency converter apps — Unless you’re actively selling internationally, these add JS for zero benefit.
    • Social media feed widgets — Instagram/Facebook feed embeds slow your site significantly and rarely drive conversions.
    • Countdown timer apps — These erode trust. Customers know the “sale ending in 2 hours” resets every visit.
    • Multiple pop-up apps — One pop-up for email capture is fine. Three overlapping pop-ups (email + spin wheel + exit intent) is a terrible experience.
    • Backup apps — Shopify has its own version history. Unless you’re making frequent theme code changes, a backup app is unnecessary.

    How to Audit Your Current Apps

    1. List every installed app — Go to Settings → Apps and sales channels
    2. For each app, ask: “If I removed this today, would I lose revenue this week?” If the answer is no or maybe, uninstall it.
    3. Check your site speed before and after — Use Google PageSpeed Insights. Remove apps one by one and measure impact.
    4. Track actual ROI — A ₹2,000/month upsell app that generates ₹500/month in extra revenue is losing you ₹1,500/month.

    If your monthly app bill is over ₹15K, you’re probably overspending

    The 7-app stack above is what we install on every Shopify build for Indian D2C brands. Most stores we audit have 18–25 apps installed and only 6–8 of them are earning their keep. We strip the rest, you save ₹5K–₹15K/month, and the store gets faster. We’ve done it for 200+ Indian D2C brands. ₹385Cr+ revenue processed. 4.5x average ROI. 98% retention.

    The Shopify build is ₹50,000 fixed-price with no AMC — bug fixes for what we ship are included for the lifetime of the store, and you ship on the Growww Tech custom theme customised to your brand.

    Start a WhatsApp chat: Message the Growww Tech team on WhatsApp →

    Related reading:

  • RTO Hit 40%? The Playbook That Got Us to 8%

    RTO Hit 40%? The Playbook That Got Us to 8%

    A fashion D2C brand came to us with a 42% RTO rate on COD orders. They were shipping 3,000 orders/month, and 1,260 were coming back undelivered. At ₹210 per failed delivery (forward + reverse shipping + repackaging + blocked inventory), they were losing ₹2.6 lakh every single month — just on returns to origin.

    Six weeks later, their RTO was at 11%. Eight weeks after that, it stabilized at 8%.

    This isn’t magic. It’s a systematic approach that any Indian D2C brand can implement. Here’s the exact playbook.

    Why RTO Is So High in India (Understanding the Problem)

    Data from 142 Indian D2C brands shows 28-35% average RTO rates on COD orders, with some categories hitting 40-50%. The causes break down roughly as:

    Cause% of Total RTOFixable?
    Impulse/fake COD orders (no intent to pay)40-50%Yes — verification flows
    Customer changed mind (buyer’s remorse)20-25%Partially — faster delivery helps
    Wrong/incomplete address15-20%Yes — address validation
    Competitor sabotage orders5-10%Yes — verification + blacklisting
    Genuine delivery failure (customer unavailable)5-10%Partially — NDR management

    The key insight: 60-70% of RTO is preventable. You just need the right systems in place.

    The 8-Step RTO Reduction Playbook

    Step 1: WhatsApp COD Verification (Impact: -25 to 40% RTO)

    This is the single highest-impact change. After a COD order is placed, automatically send a WhatsApp message asking the customer to confirm:

    “Hi [Name]! Your order for [Product] worth ₹[Amount] has been placed. Reply YES to confirm, or CANCEL to cancel. Order will be shipped within 24 hours of confirmation.”

    Rules:

    • No confirmation within 4 hours → Send reminder
    • No confirmation within 12 hours → Auto-cancel the order
    • Customer replies CANCEL → Cancel immediately (saves shipping cost)
    • Phone number not on WhatsApp → Trigger IVR call (Step 2)

    Tools: GoKwik (₹2,000-5,000/month), Interakt, AiSensy, KwickReply

    This alone filters out 25-40% of fake/impulse COD orders before you spend a single rupee on shipping.

    Step 2: IVR Call Verification for High-Value Orders (Impact: -10 to 15% RTO)

    For COD orders above ₹1,000 (where RTO loss hurts the most), add an automated phone call:

    “This is an automated call from [Brand]. You’ve placed an order worth ₹[Amount]. Press 1 to confirm delivery. Press 2 to cancel.”

    Tools: Exotel, MyOperator, Knowlarity — all integrate via webhooks. Cost: ₹0.50-1.50 per call. At ₹1 per call vs ₹210 per failed delivery, the ROI is 210x.

    Step 3: Address Validation and Scoring (Impact: -10 to 15% RTO)

    Bad addresses are responsible for 15-20% of RTO. Implement address validation at checkout:

    • Pin code validation — Verify pin code exists and matches city/state
    • Address completeness check — Require house/flat number, street, landmark
    • Phone number verification — Ensure 10-digit valid mobile number
    • Historical RTO scoring — Flag addresses/pin codes with high RTO history

    GoKwik’s AI-based address scoring assigns a risk score to every order. Orders scoring above a threshold can be automatically restricted to prepaid-only or flagged for manual review.

    Step 4: Prepaid Conversion Incentives (Impact: Eliminates COD RTO)

    Every COD order you convert to prepaid has near-zero RTO risk. Prepaid orders RTO at just 2-5% (mostly genuine delivery failures) vs 28-35% for COD.

    Tactics that work:

    • ₹50-100 off for prepaid — “Pay online and save ₹50” is the most effective. Indian customers respond strongly to explicit savings.
    • Free express shipping for prepaid — Standard 5-7 day for COD, 2-3 day for prepaid
    • Extra loyalty points for prepaid — 2x points on prepaid orders
    • Partial COD — Customer pays ₹99-199 upfront via UPI, rest on delivery. This small commitment reduces RTO by 40-50%.

    Top D2C brands achieve 50-60% prepaid rates with these tactics. If your current prepaid rate is 30%, getting to 50% means 20% of your orders move from 30% RTO risk to 3% RTO risk.

    Step 5: RTO Blacklist Management (Impact: -5 to 10% RTO)

    Maintain a database of addresses, phone numbers, and pin codes with repeat RTO history:

    • 2+ RTO from same phone number → Block COD, allow prepaid only
    • 2+ RTO from same address → Block COD
    • Pin codes with >50% RTO rate → Restrict COD or add mandatory verification

    GoKwik and Shiprocket maintain cross-brand RTO databases, so you benefit from the collective intelligence of thousands of sellers — a first-time customer on your store may already have RTO history on other stores.

    Step 6: NDR (Non-Delivery Report) Automation (Impact: Recovers 15-25% of RTO)

    When a delivery attempt fails, don’t let the courier auto-return the package. Instead:

    1. Instant WhatsApp notification — “We tried delivering your order but couldn’t reach you. Please confirm your address and preferred delivery time.”
    2. Customer responds → Reattempt with updated info within 24 hours
    3. No response in 12 hours → IVR call to confirm
    4. No response in 24 hours → Second delivery attempt
    5. Still no response after 48 hours → Return to origin, blacklist address for future COD

    Good NDR management alone recovers 15-25% of would-be RTO orders. On 1,000 monthly RTO-bound orders, that’s 150-250 orders saved — worth ₹31,500-52,500 in avoided RTO costs.

    Step 7: Faster Delivery (Impact: -5 to 10% RTO)

    The longer the gap between order and delivery, the higher the RTO. Buyer’s remorse kicks in after 48 hours. If your delivery takes 5-7 days, the customer has had a full week to change their mind, order from a competitor, or simply forget.

    How to speed up delivery:

    • Same-day dispatch — Ship all orders placed before 2 PM the same day
    • Regional warehousing — Place inventory near your top-selling pin codes (reduces delivery from 5-7 days to 2-3 days)
    • Use express couriers for COD — The extra ₹20-30 for express is cheaper than the ₹210 RTO cost

    Step 8: COD Surcharge (Impact: -5 to 8% RTO + Revenue)

    Charge a ₹30-50 COD handling fee. This does three things:

    1. Discourages impulse/fake orders — someone willing to pay extra is more serious
    2. Nudges price-sensitive customers toward prepaid (to avoid the fee)
    3. Partially offsets RTO losses on remaining COD orders

    Shopify tools: Releasit COD Form & Upsells, EasyCOD — both support COD surcharges for Indian stores.

    Implementation Timeline: 6 Weeks to Sub-10% RTO

    WeekActionExpected Impact
    Week 1Set up WhatsApp COD verification (GoKwik or Interakt)Immediate 25-30% drop in fake orders
    Week 2Add prepaid incentive (₹50 off) + COD surcharge (₹40)10-15% shift from COD to prepaid
    Week 3Implement address validation + pin code scoringBlock 5-10% risky orders
    Week 4Set up IVR verification for orders above ₹1,000Additional 10-15% RTO reduction on high-value
    Week 5Activate NDR automation workflowRecover 15-25% of failed deliveries
    Week 6Build RTO blacklist from first 5 weeks of dataBlock repeat offenders, compound the gains

    The Math: What RTO Reduction Is Worth

    For a brand doing 3,000 orders/month with 60% COD (1,800 COD orders):

    MetricBefore (35% RTO)After (8% RTO)Savings
    COD orders that RTO630144486 fewer RTO
    Monthly RTO cost (at ₹210 each)₹1,32,300₹30,240₹1,02,060/month
    Annual RTO savings₹12,24,720/year
    Cost of verification stack₹5,000-7,000/monthNet: ₹10.4L+ saved/year

    ₹12+ lakh saved annually — from a ₹5,000-7,000/month investment in verification tools. That’s a 15-20x ROI.

    Common Mistakes That Sabotage RTO Reduction

    • Disabling COD entirely — In Tier 2/3 cities, COD is 60-70% of orders. Removing COD kills revenue. Manage it, don’t remove it.
    • Verification without incentives — If you add WhatsApp verification but no prepaid incentive, you just add friction without shifting behavior.
    • Ignoring NDR — Most brands focus only on prevention but ignore recovery. NDR management is free money sitting on the table.
    • Not tracking RTO by source — RTO from Meta ads vs organic vs Google can vary wildly. Track by acquisition channel and pause high-RTO campaigns.
    • Shipping slow to save money — The ₹15 you save on economy shipping costs you ₹210 when the customer RTOs because delivery took 8 days.

    If your RTO is above 15%, the leak is fixable

    The verification stack above is what we wire into every Shopify build that ships in a COD-heavy category. Most brands hit ₹10L+ saved/year inside the first quarter once all five layers are running together. We’ve done it for 200+ Indian D2C brands. ₹385Cr+ revenue processed. 4.5x average ROI. 98% retention.

    The Shopify build is ₹50,000 fixed-price with no AMC — bug fixes for what we ship are included for the lifetime of the store. The RTO integration sits on the optional ₹30K/month Growth Retainer, only when you want active month-over-month optimisation.

    Start a WhatsApp chat: Message the Growww Tech team on WhatsApp →

    Related reading: